21 DIY Halloween Decorations Outdoor for a Spooky Yard
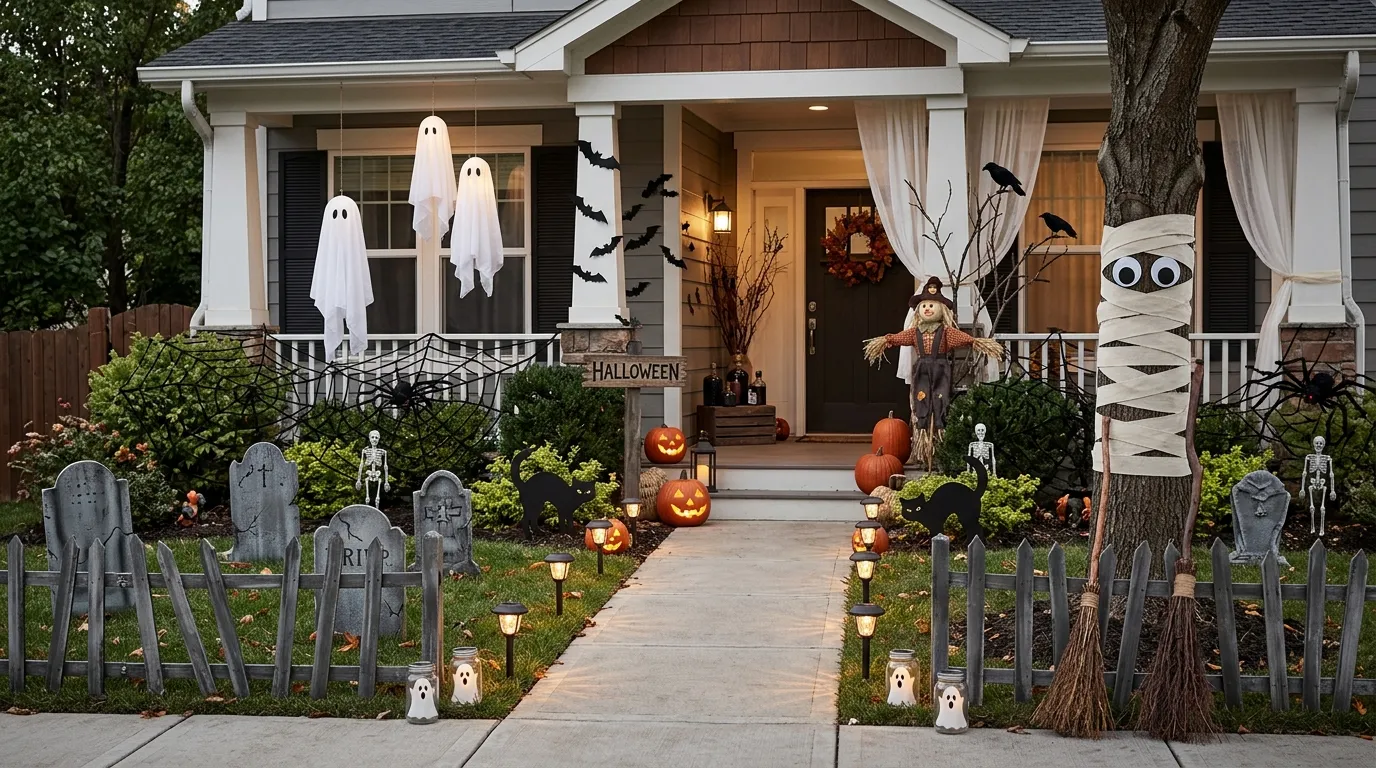
Your yard can become the most memorable part of your Halloween display—with a few creative touches and almost no complicated crafting.
Think glowing pumpkins, eerie silhouettes, creepy ghosts, and handmade props that make every corner feel festive.
These DIY Halloween decorations outdoor are designed to help you transform an ordinary yard into a spooky, welcoming space without spending a fortune on ready-made decorations. Whether you have a small porch, a narrow walkway, or a spacious lawn, you’ll find ideas that can work with the space you already have. From simple recycled materials to eye-catching handmade pieces, each project adds personality while keeping the setup practical. In my experience, the best Halloween displays often combine a few strong focal points with smaller details that create atmosphere. These ideas make it easy to build a yard you’ll be excited to photograph, enjoy, and share on Pinterest.
DIY Graveyard Fence
- Create a spooky boundary without expensive store-bought props.
- Use lightweight wood, cardboard, or foam for easy shaping.
- Add uneven spacing to make the yard feel naturally eerie.
- Keep the fence low enough to remain practical around walkways.
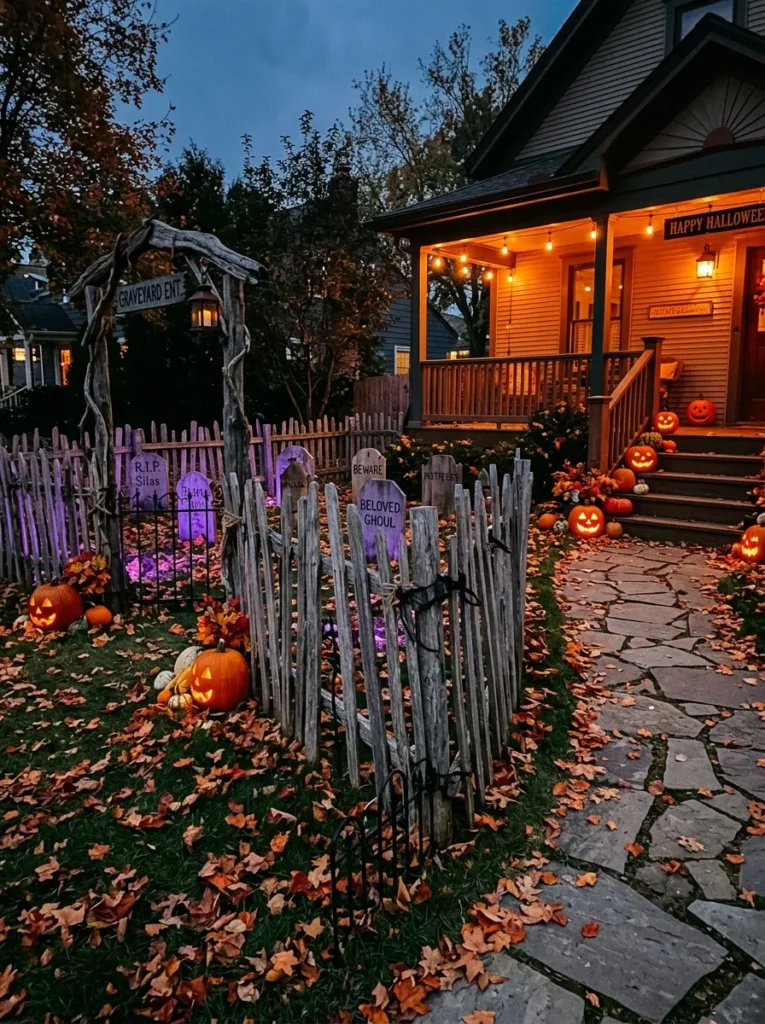
A crooked graveyard fence can instantly turn an ordinary lawn into a spooky Halloween scene. The uneven pickets create a handmade look that feels more interesting than a perfectly straight barrier. Paint lightweight boards in charcoal, gray, or faded brown, then distress the edges with sandpaper for an aged finish. Place the fence around a small section of lawn rather than blocking the entire yard. This keeps the display practical while creating a clear focal area. In my experience, slightly uneven spacing makes homemade decorations look intentionally weathered instead of overly polished or artificial.
For a stronger effect, surround the fence with a few foam tombstones, dry branches, and scattered faux leaves. You can push some stakes slightly deeper into the ground so the top edges sit at different heights. Add solar lights or small outdoor-safe spotlights behind the fence to create long shadows after sunset. Black paint works well for a dramatic finish, while gray highlights can make the wood look older. This simple setup is especially useful for homeowners who want DIY Halloween decorations outdoor without filling every inch of the yard with props.
Hanging Ghost Trio
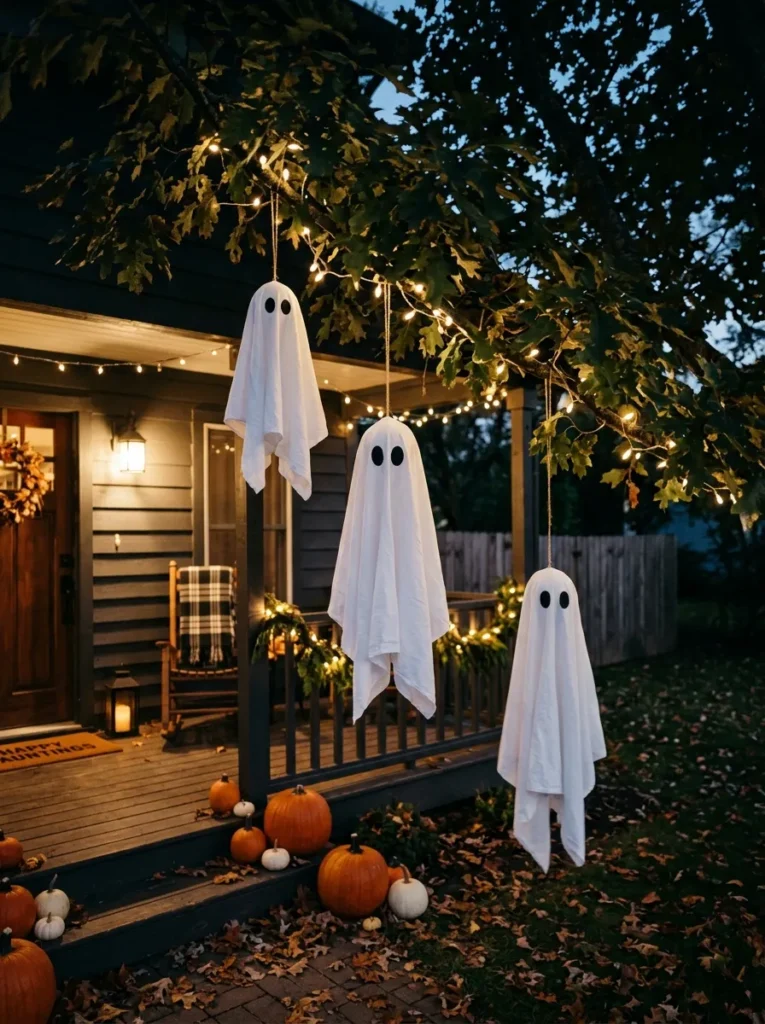
- Repurpose white fabric, pillowcases, or lightweight sheets.
- Use simple round forms to create recognizable ghost shapes.
- Hang the figures at different heights for better visual movement.
- Choose weather-resistant materials when the display will stay outside.
Few decorations create instant Halloween personality like simple ghosts floating above a yard. Use lightweight white fabric over round forms, then secure each shape with strong outdoor cord. Keep the faces minimal with black felt or washable fabric paint so the figures remain clean and recognizable from the street. Hang three ghosts at different heights from a tree branch, porch beam, or sturdy outdoor structure. Their varying positions create movement and make the display feel larger than it really is. I’ve noticed that simple shapes often photograph better because their silhouettes remain clear against darker backgrounds.
To make the arrangement look polished, place the tallest ghost toward the back and the smaller figures closer to the viewing area. A few pumpkins, lanterns, or fallen leaves underneath can visually anchor the hanging decorations. If your climate is windy, choose tightly secured fabric and avoid placing the ghosts over frequently used paths. Soft warm lights can illuminate them without making the yard look harsh. The result is a playful outdoor display that adds height, movement, and Halloween character while keeping the overall setup inexpensive and easy to recreate.
Pumpkin Path Lights
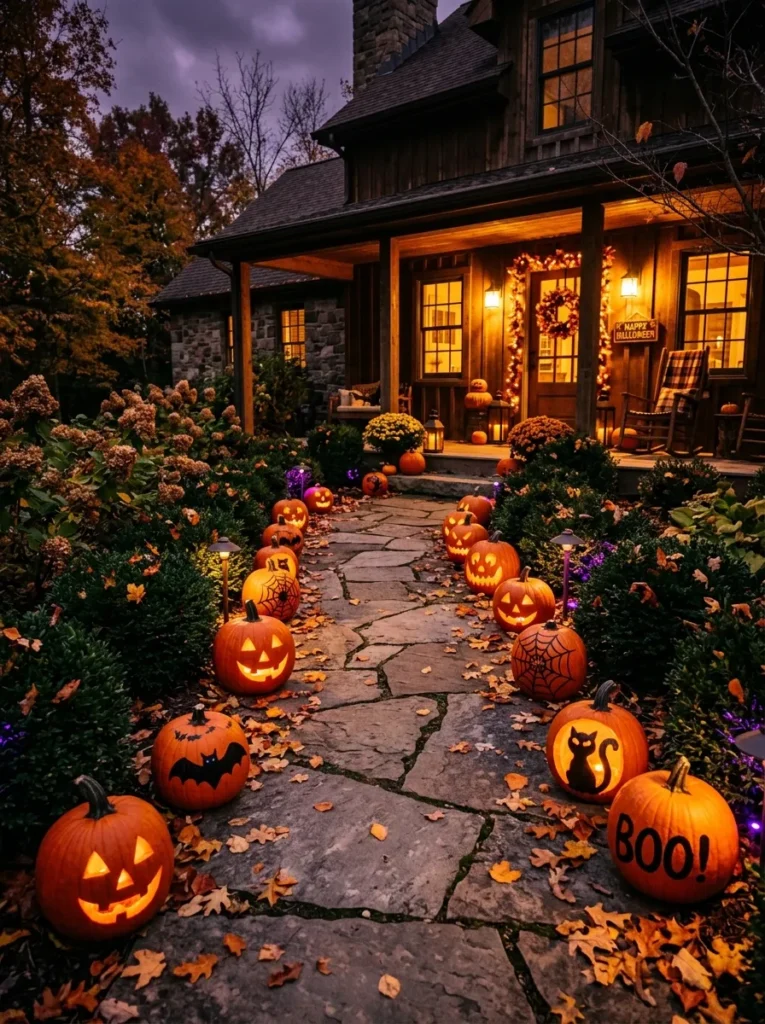
- Line the walkway with painted or carved pumpkin lanterns.
- Mix real pumpkins with lightweight reusable versions.
- Keep spacing consistent for a cleaner visual rhythm.
- Use battery or solar lighting designed for outdoor conditions.
A glowing pumpkin pathway makes the route to your front door feel instantly more intentional. Instead of placing pumpkins randomly across the lawn, arrange them along both sides of the walkway at similar intervals. This creates a strong visual rhythm and naturally guides visitors toward the entrance. Choose pumpkins in different sizes, but keep the overall color palette simple with orange, cream, black, and muted green. For safer lighting, battery-powered or solar LED candles can replace open flames. This approach gives you the classic Halloween glow while keeping the display practical for families and frequently used outdoor spaces.
You can make the arrangement more distinctive by painting a few pumpkins with simple stripes, dots, moons, or black geometric patterns. Place taller pumpkins behind smaller ones so every piece remains visible from the street. If your walkway is narrow, keep decorations close to the edges and leave enough room for comfortable foot traffic. A few autumn leaves around the bases can soften the arrangement and connect it with the surrounding landscape. The finished path works beautifully as one of the most approachable DIY Halloween decorations outdoor, especially when you want maximum impact with minimal construction.
Witch Hat Walkway
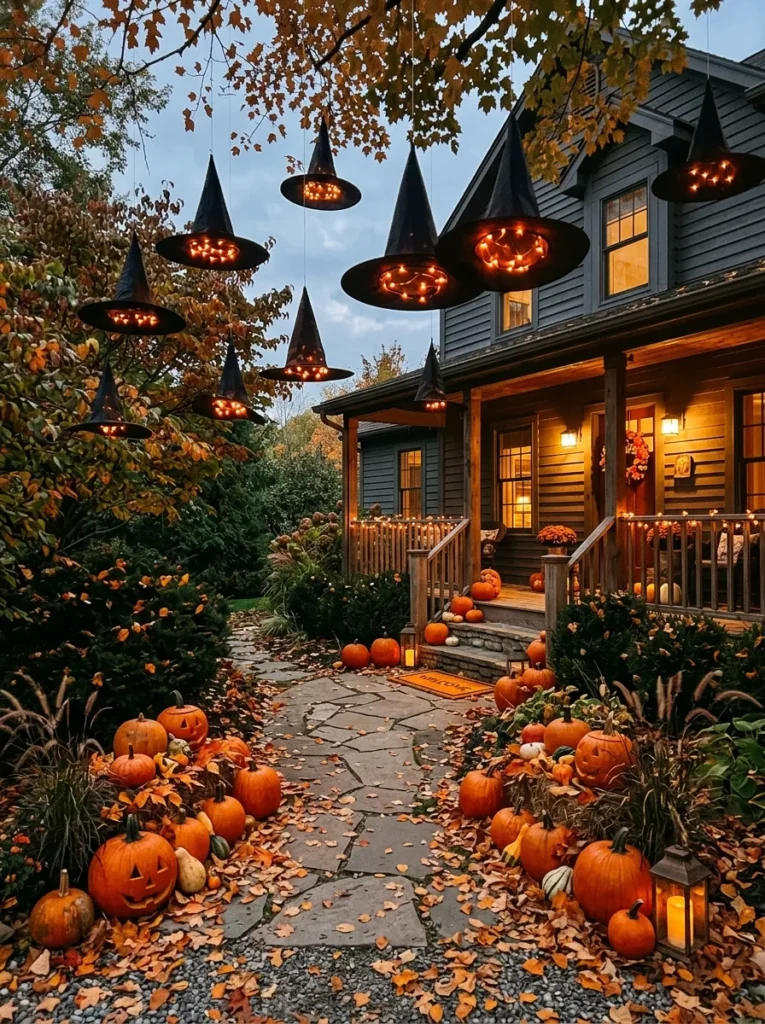
- Suspend lightweight witch hats along the front walkway or porch.
- Choose black hats with different sizes for layered height.
- Add tiny warm lights inside selected hats for evening glow.
- Secure each hat firmly to withstand outdoor breezes.
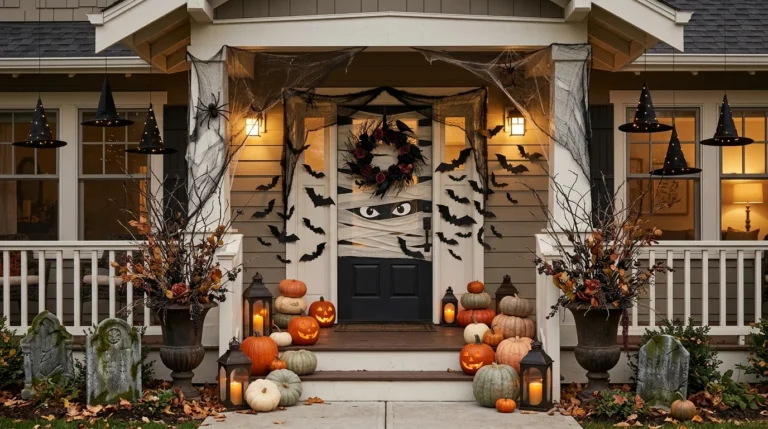
A row of floating witch hats can make a plain walkway feel surprisingly magical without covering the ground with decorations. Choose lightweight hats in several sizes and suspend them from clear outdoor line, sturdy branches, or a porch structure. Keep the hats at slightly different heights to create a playful overhead arrangement. Black works beautifully against a pale house exterior, while small orange details underneath connect the display to traditional Halloween colors. The open space beneath the hats keeps the walkway usable, making this a smart choice for smaller yards where floor decorations can quickly become crowded.
For nighttime appeal, place a small battery-powered LED inside a few hats, leaving others unlit for contrast. The gentle glow highlights their shapes without overwhelming the rest of the yard. Add pumpkins or lanterns along the edges, but avoid placing too many competing decorations nearby. I’ve seen this approach work especially well around covered porches because the overhead structure provides convenient attachment points. With secure knots and weather-resistant materials, the display can stay neat through breezy evenings while giving visitors an unexpected Halloween detail overhead.
Cardboard Tombstones
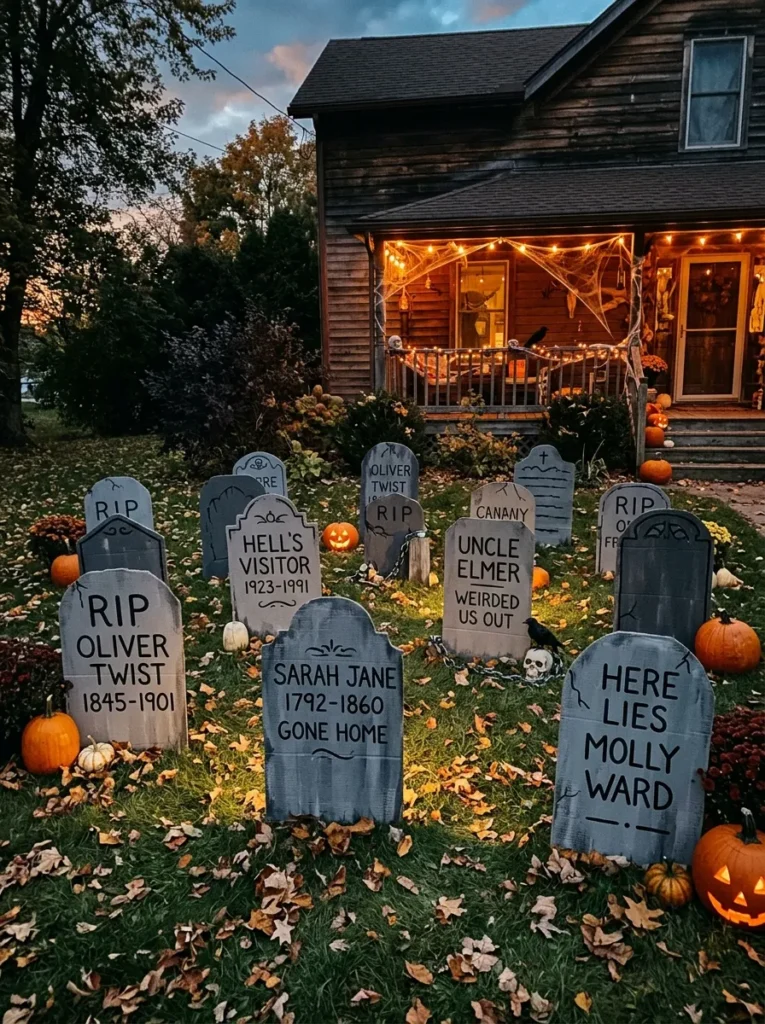
- Turn sturdy cardboard into lightweight faux grave markers.
- Paint each piece in layered gray and charcoal tones.
- Add simple lettering for a classic cemetery appearance.
- Protect finished surfaces from moisture before outdoor placement.
Homemade tombstones are an easy way to build a cemetery scene without buying heavy decorations. Cut sturdy cardboard into simple arched, rounded, or chipped shapes, then reinforce the backs so they remain upright. Paint them in several shades of gray instead of one flat color to create the appearance of aged stone. A little charcoal around the edges adds depth and makes the shapes easier to see from the street. Keep the lettering simple, especially if the pieces will be viewed from a distance. This small detail can turn an ordinary patch of grass into a recognizable Halloween graveyard.
Place the tombstones in loose rows rather than a perfectly organized grid. Slightly tilting a few pieces creates a more natural abandoned-cemetery effect while keeping the overall arrangement visually balanced. Add faux moss, dry leaves, small pumpkins, or bare branches around their bases for extra texture. Because cardboard is vulnerable to rain, use it in sheltered areas or seal the surface thoroughly with an appropriate outdoor coating. This idea works particularly well when you want diy halloween decorations outdoor that are lightweight, inexpensive, customizable, and easy to store after the holiday.
Spiderweb Shrubs
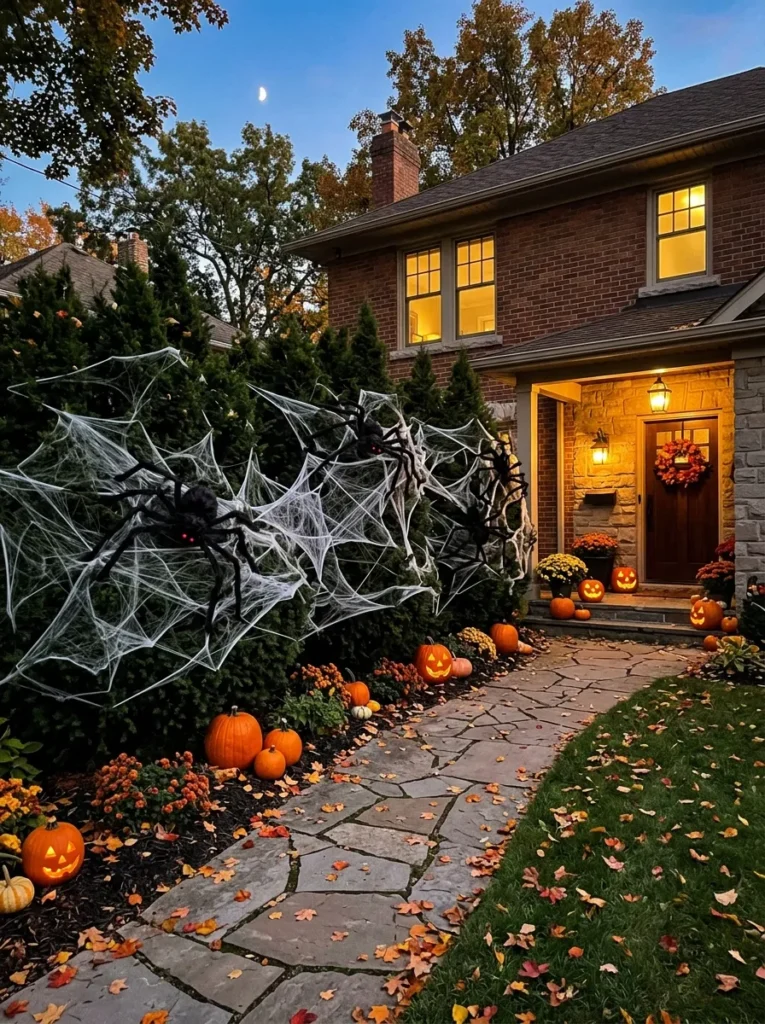
- Stretch artificial webbing across existing bushes and shrubs.
- Add oversized spiders for an instantly recognizable focal point.
- Keep the webbing loose enough to create natural-looking layers.
- Avoid covering plants completely so their shapes remain visible.
Turn ordinary shrubs into eerie garden features with layered spiderweb decorations. Start by stretching thin white webbing across the outer branches, allowing some sections to hang loosely while other areas remain pulled tight. This contrast creates a more convincing web texture than covering the entire plant evenly. Add one or two oversized black spiders where they can be seen clearly from the sidewalk. Existing shrubs provide the perfect structure, so there is little construction involved. The dark green foliage also creates a strong backdrop that makes pale webbing stand out during both daylight and evening hours.
For a polished yard, concentrate the webs on selected bushes rather than covering every plant. Leave some greenery exposed so the landscaping still feels intentional and dimensional. Secure the webbing with small clips or ties that will not damage delicate branches. A warm porch light can highlight the texture after sunset, while a few pumpkins near the shrub bases add color and visual weight. I’ve noticed that using fewer large spiders usually looks more convincing than scattering many tiny ones. The result feels spooky without becoming visually cluttered or difficult to maintain.
Creepy Window Silhouettes
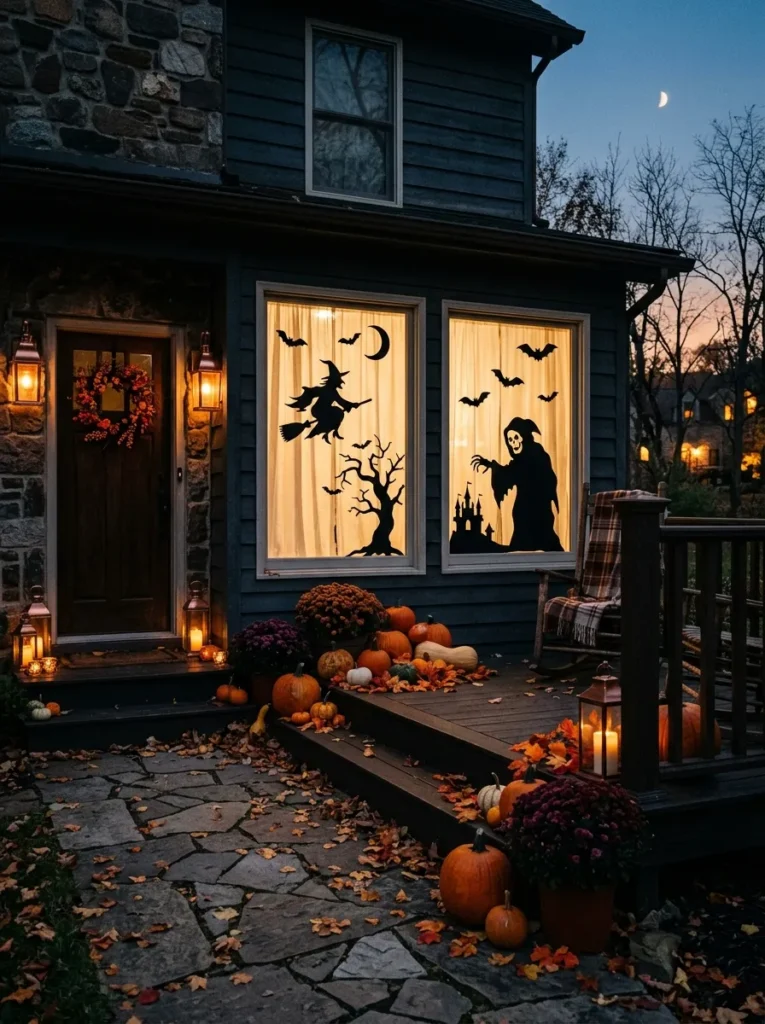
- Cut simple spooky shapes from black poster board or foam.
- Place silhouettes behind windows facing the front yard.
- Use interior lighting to make the figures clearly visible.
- Keep designs bold enough to read from the street.
Windows are perfect for Halloween decorating because they offer a large vertical surface without taking up valuable yard space. Cut silhouettes of bats, cats, witches, or spooky figures from black poster board, then position them on the inside of front-facing windows. When the room behind them is softly illuminated, the shapes become striking from outside. Choose simple designs with strong outlines because small details can disappear at night. This is especially useful for homes with limited outdoor space, where vertical decorations can create a dramatic effect without blocking paths, plants, or entry areas.
For the best visual balance, vary the size and placement of your silhouettes across several windows rather than repeating the same shape everywhere. Keep the interior light slightly diffused with curtains or sheer fabric so the silhouettes remain crisp without creating harsh glare. Black shapes work beautifully with warm white lighting, while a subtle orange lamp can introduce traditional Halloween color. Because the decorations stay indoors, they are protected from rain and wind. This simple technique gives your outdoor display extra depth by making the house itself part of the Halloween scene.
Hanging Bat Swarm
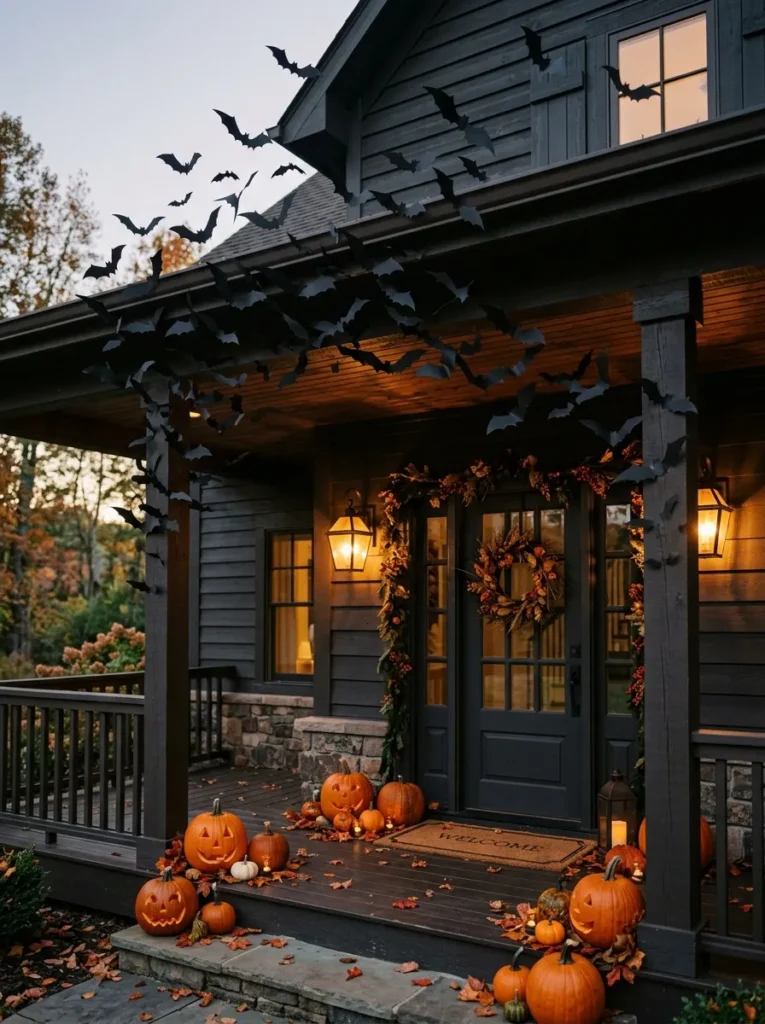
- Create lightweight bats from black cardstock or craft foam.
- Arrange different sizes to suggest natural movement.
- Cluster them near porch ceilings, trees, or exterior walls.
- Use removable outdoor-safe attachments where possible.
A cluster of flying bats can make an otherwise empty porch ceiling feel dramatically more finished. Cut bat shapes from black cardstock, craft foam, or another lightweight material, then fold the wings slightly so each piece catches the light differently. Use several sizes and rotate their directions to create the appearance of movement. Instead of spreading them evenly, start with a dense group near one corner and gradually space the bats farther apart. This simple composition creates a natural visual flow that draws the eye across the porch and toward the entrance.
Attach the bats with removable hooks, outdoor-safe adhesive, or thin line suited to your surface. If you have a nearby tree, allow a few bats to extend from the porch toward its branches, creating a connection between the house and yard. Warm porch lighting will make the black shapes especially crisp after dark. I’ve noticed that matte black material usually looks more sophisticated than shiny paper because it absorbs light and creates stronger silhouettes. Keep the arrangement concentrated in one area so the display feels intentional rather than scattered.
Ghost Lantern Jars
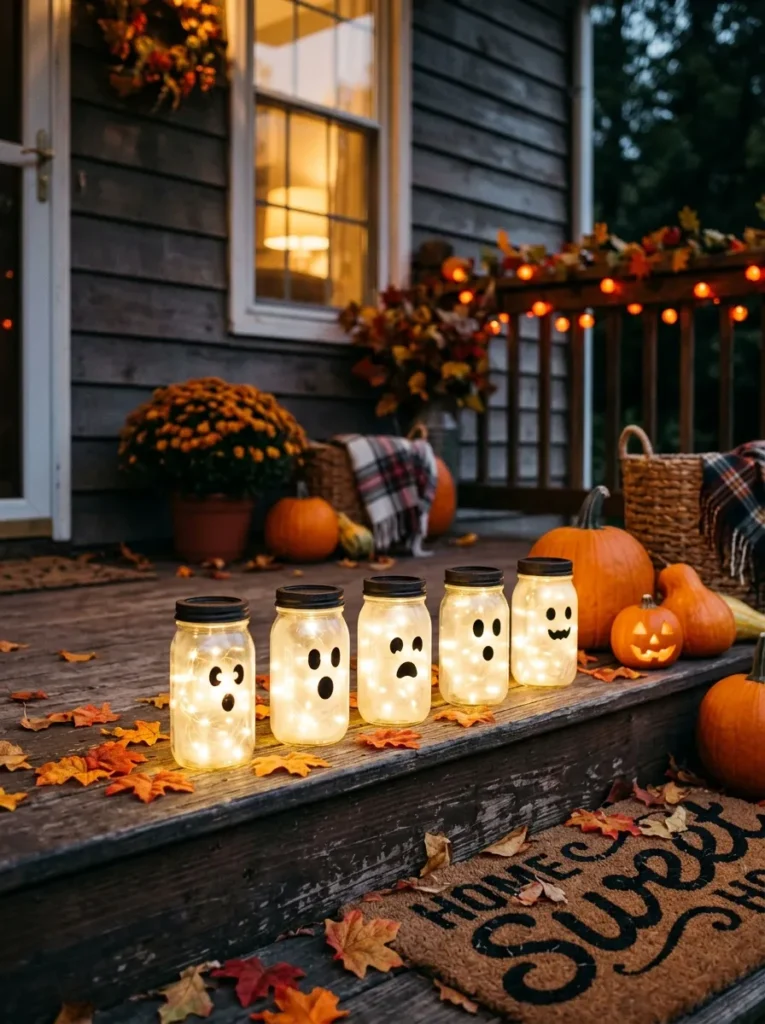
- Transform clear jars into small glowing ghost lanterns.
- Use battery-powered LED lights instead of open flames.
- Draw simple faces for an easy handmade finish.
- Group several jars together for stronger nighttime impact.
Small glowing jars can add warmth and personality to steps, porch tables, or sheltered outdoor shelves. Clean clear jars provide an easy base for miniature ghost lanterns, while simple black eyes and mouths create recognizable faces without complicated crafting. Place a battery-powered LED candle or small string light inside each jar for a soft glow. White tissue, translucent fabric, or frosted craft material can soften the light if you want a more ghostly appearance. Group several jars together rather than using one alone, especially when decorating a wide porch or long set of steps.
Vary the jar heights and face expressions to make the arrangement feel handmade and playful. Keep the brightest lights toward the center and slightly dimmer pieces around the edges for a gentle visual gradient. If the jars will be exposed to moisture, choose weather-resistant containers and protect the battery components appropriately. Place them where they cannot be easily knocked over by pets or passing guests. This approach adds small-scale lighting that complements larger yard decorations while giving your Halloween setup a welcoming glow after sunset.
Monster Lawn Eyes
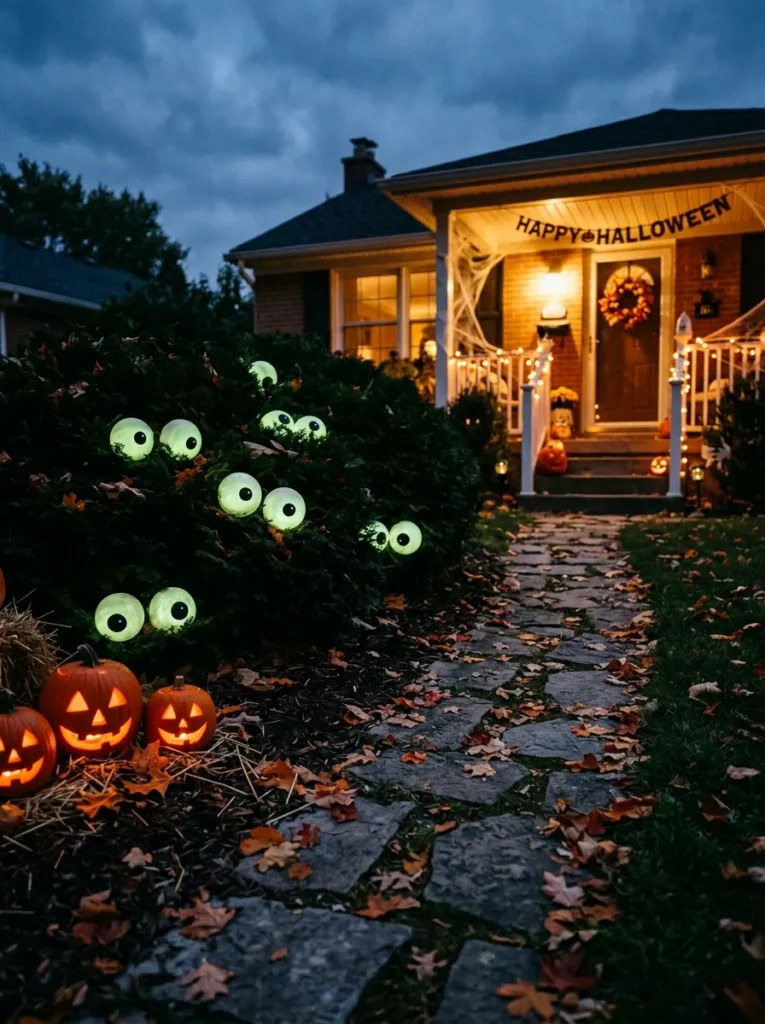
- Create oversized glowing eyes from painted plastic bowls.
- Position pairs between shrubs, flowers, or garden paths.
- Choose different eye sizes for a playful layered effect.
- Use weather-resistant LED lights for nighttime visibility.
Give your lawn a little personality by hiding oversized monster eyes among existing plants. Large plastic bowls, lightweight spheres, or recycled containers can become simple eye shapes with white paint and bold black pupils. Place them partially behind shrubs so only the eyes are visible, creating the impression that something is quietly watching from the garden. This works especially well along pathways because visitors notice the shapes as they approach. The design uses landscaping you already have, so the finished scene feels integrated instead of looking like decorations simply scattered across the grass.
For evening impact, place a small weather-resistant LED light behind each eye or use translucent materials that allow the glow to pass through. Keep the lighting subtle so the eyes remain mysterious rather than looking overly bright. You can make one pair large and another smaller to create depth across the yard. In my experience, hiding part of each eye behind foliage makes this idea much more convincing. A few fallen leaves and dark mulch around the bases can complete the scene while keeping the rest of your garden looking neat.
Witch Broom Display
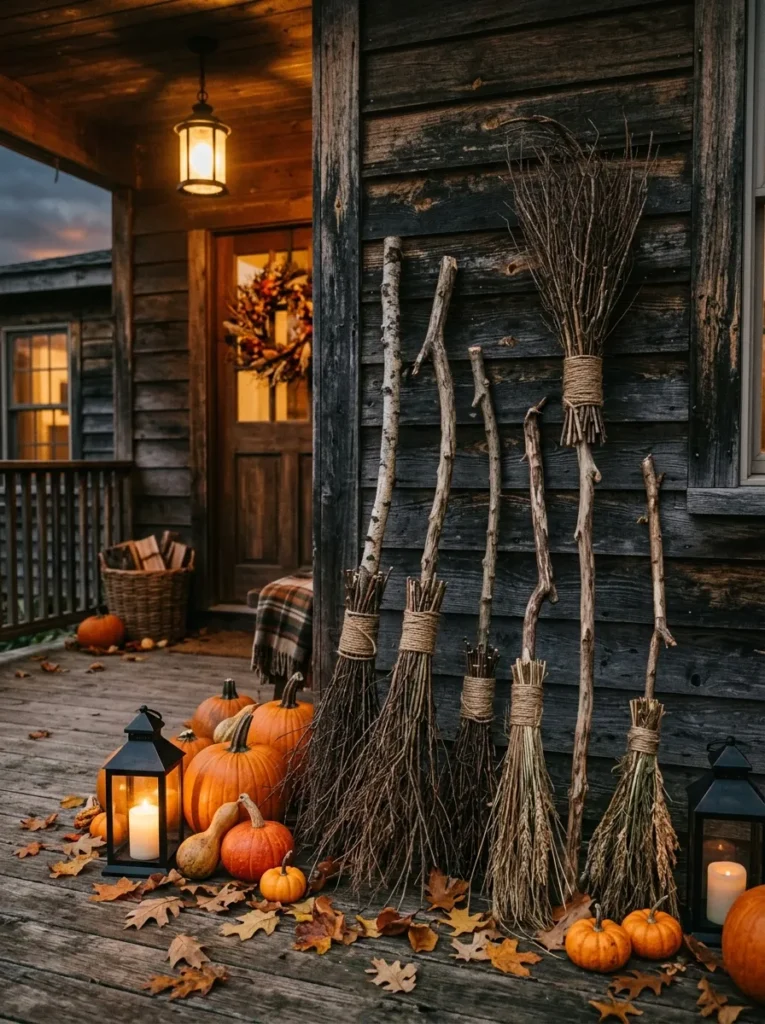
- Lean handmade brooms against the porch or exterior wall.
- Combine natural branches with twine for rustic texture.
- Vary broom heights to create a balanced arrangement.
- Add pumpkins or lanterns around the base.
A collection of rustic witch brooms can fill an empty porch corner with very little effort. Gather straight branches for handles and bundle thin twigs, dried grasses, or flexible stems around the lower ends. Secure the bundles tightly with natural twine, then leave the materials slightly uneven for an authentic handmade appearance. Lean several brooms against a wall, beside the front door, or near a porch column. Their tall shapes add vertical interest without requiring much floor space. This makes them particularly useful when your yard already contains larger decorations and you want a quieter supporting detail.
Use different broom lengths and slightly different angles so the arrangement does not look overly symmetrical. A black lantern or two pumpkins at the base can visually anchor the display and connect it with the rest of your Halloween decor. If the brooms will remain outdoors for several weeks, choose dry materials that tolerate your local weather and secure everything against wind. Natural wood, rough twine, and dried branches also pair beautifully with farmhouse or rustic landscaping, giving the Halloween display texture that feels handcrafted rather than mass-produced.
Spooky Hanging Signs
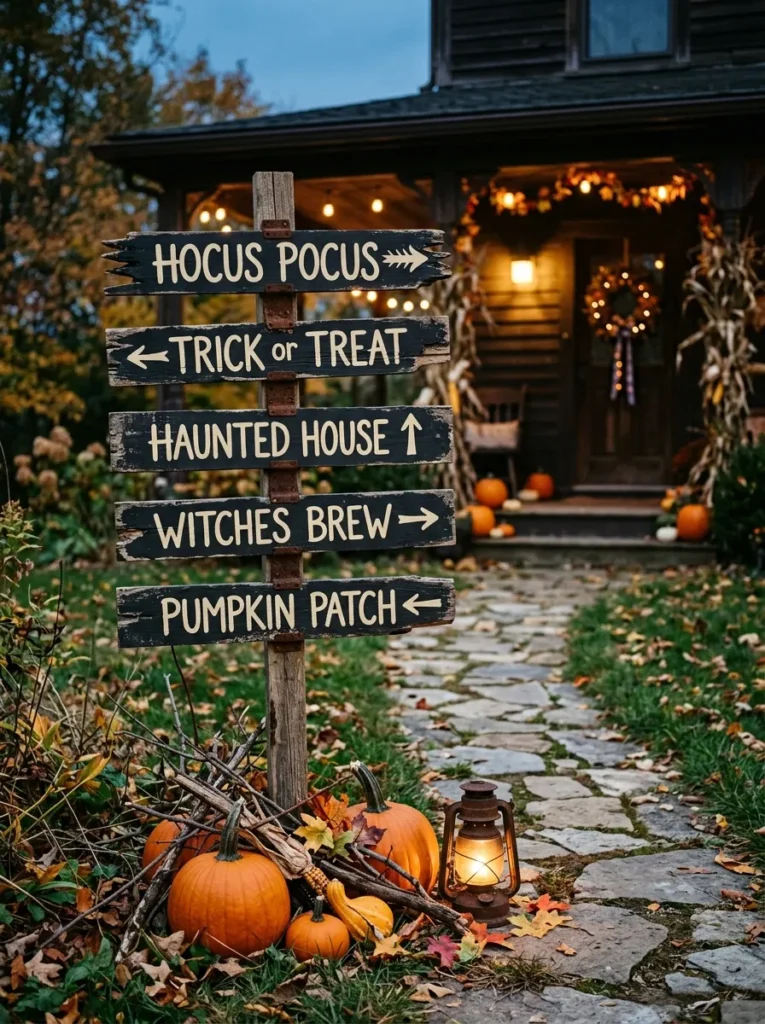
- Make directional signs from reclaimed wood or sturdy boards.
- Paint simple words such as “Beware” or “Witch Way.”
- Distress the surface for an aged, weathered appearance.
- Position signs where guests naturally approach the house.
A few handmade signs can give your yard a clear Halloween theme while adding personality to otherwise empty spaces. Use reclaimed wood, fence scraps, or sturdy craft boards to create narrow directional arrows. Paint short messages in contrasting lettering, then lightly sand the edges to give the boards a weathered appearance. Words such as “Beware,” “Witch Way,” or “Haunted” are easy to recognize from a distance. Place the signs near the walkway, driveway, or porch entrance where visitors naturally look. Their vertical shape also helps break up a flat lawn and adds another layer of visual interest.
For a cohesive display, keep the lettering and paint colors consistent across all signs. Charcoal, black, cream, muted orange, and weathered gray create a versatile palette that works with pumpkins and autumn foliage. Secure the signs to wooden stakes and push them firmly into the ground so they remain stable in wind. You can also angle the arrows in different directions for a playful effect. This is one of those diy halloween decorations outdoor that can be customized to fit almost any yard, whether your style is rustic, traditional, or slightly whimsical.
Skeleton Garden Stakes
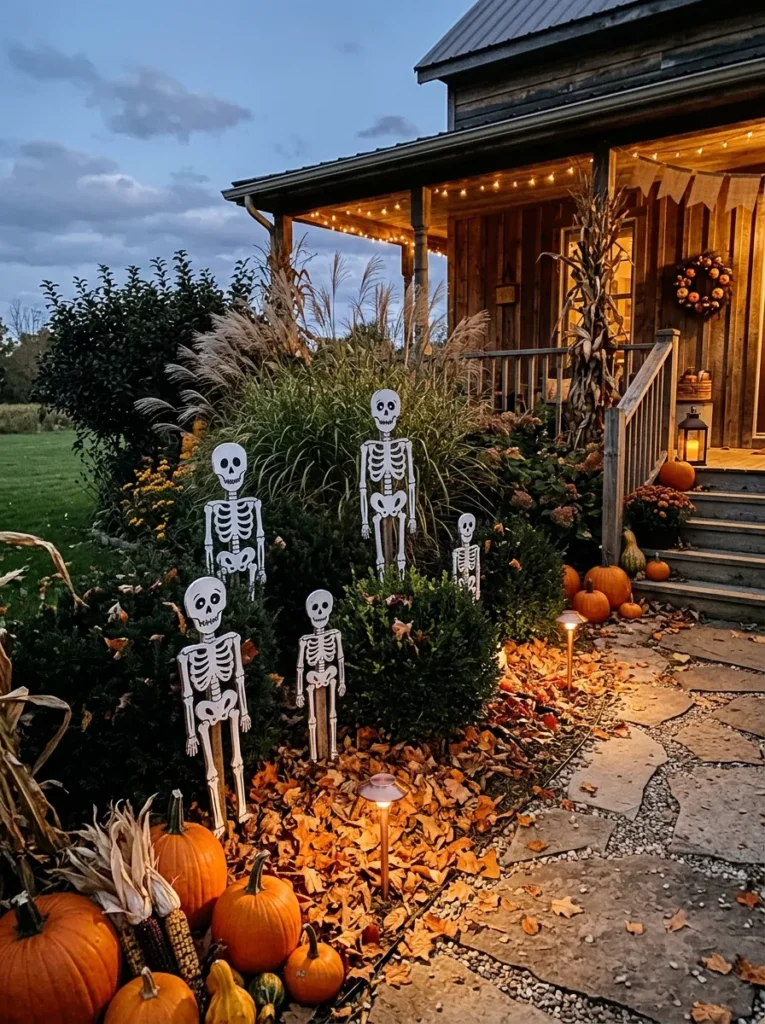
- Make simple skeleton shapes from painted wood or foam.
- Place individual figures between existing plants and shrubs.
- Use different heights to create a layered garden scene.
- Secure each stake deeply enough to resist outdoor wind.
Skeleton stakes can turn an ordinary garden bed into a playful Halloween scene without taking up much space. Cut simple body shapes from lightweight wood, foam board, or weather-resistant material, then paint them white with dark details around the eyes, joints, and ribs. Push each figure into the soil between shrubs or ornamental grasses, allowing foliage to partially hide the bodies. This creates depth and makes the figures appear naturally scattered through the landscape. The narrow design also works well in smaller yards where large freestanding props could make walkways feel crowded.
For a more interesting arrangement, vary the height and posture of each skeleton instead of making every figure identical. One can stand upright near the path while another appears lower among the plants. Use sturdy stakes and position them away from areas where people walk or mow. A few pumpkins at ground level can introduce warm orange color against the white figures and green foliage. I’ve noticed that partially hiding outdoor props behind plants makes them feel more integrated with the yard and gives the display a layered appearance from different viewing angles.
Rope Ghost Fence
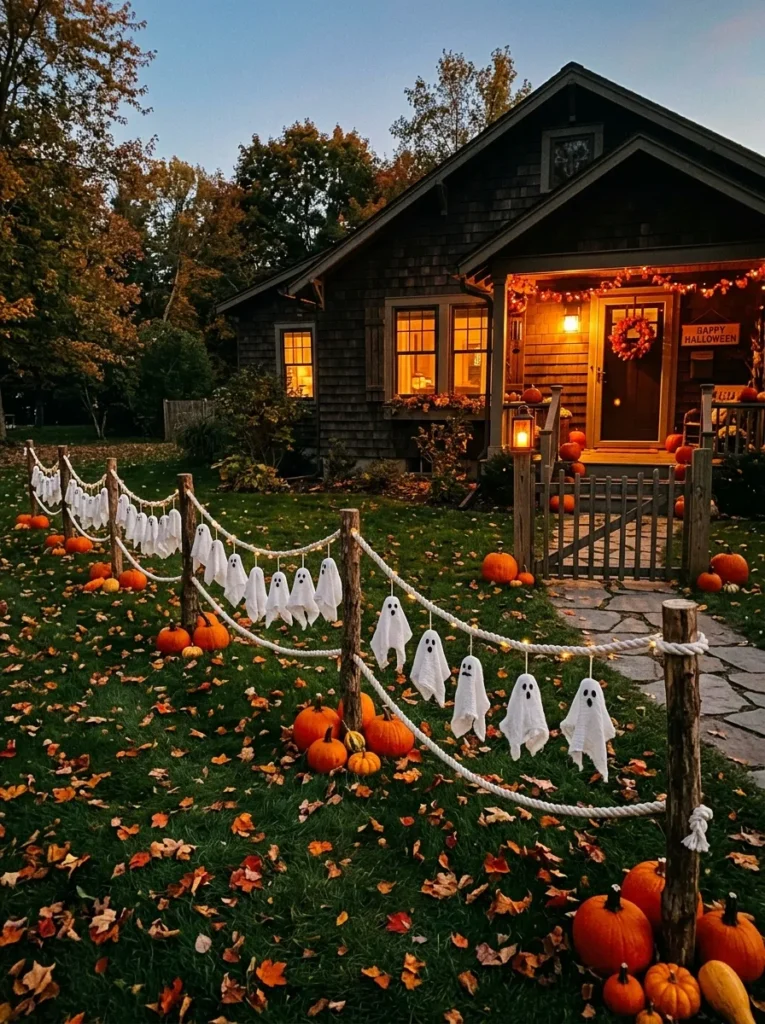
- Build a temporary ghost barrier around a lawn section.
- Use white fabric strips for soft, flowing shapes.
- Combine wooden stakes with rope for an inexpensive frame.
- Keep the barrier decorative rather than blocking walkways.
A low ghost fence adds a playful boundary while giving your lawn a more finished Halloween arrangement. Drive simple wooden stakes into the ground and connect them with sturdy rope, then attach small white fabric ghost shapes at intervals. Let the fabric hang naturally so the figures move slightly with the breeze. The combination of pale fabric, natural wood, and dark evening shadows creates plenty of contrast. Rather than surrounding the entire yard, use the fence to frame a garden bed, graveyard display, or small section near the porch.
Keep the structure low enough that it does not interfere with visibility or create a tripping hazard. Choose weather-resistant rope and securely attach the fabric so the pieces do not become loose. You can paint the wooden stakes black or leave them natural for a rustic look. Add a few pumpkins along the fence line to introduce orange accents and make the display easier to see from the street. This setup is especially useful when you want to define separate decorating zones without building a permanent structure or spending much on materials.
Black Cat Silhouettes
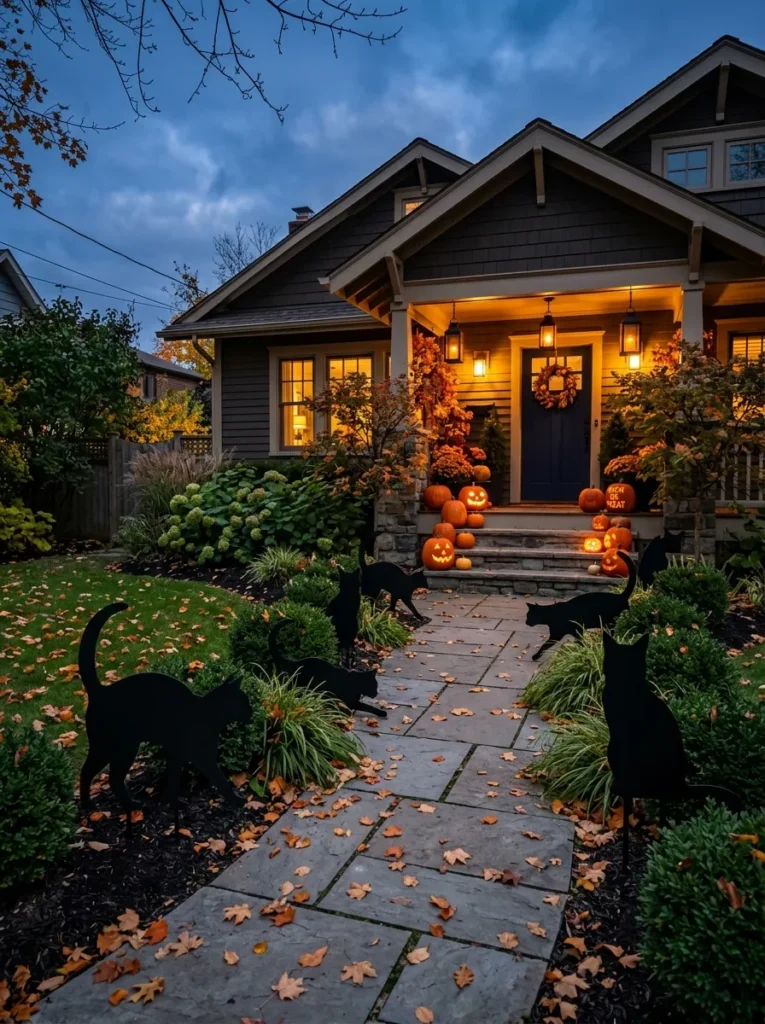
- Cut large cat shapes from plywood or sturdy foam.
- Use simple arched backs and pointed ears for recognition.
- Place silhouettes near bushes, windows, or porch corners.
- Angle figures differently to create a natural group.
Black cat silhouettes create strong visual contrast and are especially effective when viewed against a lighter wall, porch, or softly lit window. Cut simple cat profiles from plywood, foam board, or another durable material, focusing on recognizable features such as pointed ears, curved backs, and raised tails. Paint the figures matte black so they read clearly from a distance. Place several cats around the yard rather than clustering them in one spot. Their different positions can make the display feel like a small group quietly exploring the landscape.
For stability, attach each silhouette to a sturdy ground stake and position it away from sprinkler heads, busy walkways, and mowing paths. Try placing one cat near a shrub, another beside the porch steps, and a third closer to the driveway. Orange pumpkins or warm lanterns nearby provide color without competing with the silhouettes. In my experience, simple profiles usually look stronger outdoors than highly detailed designs because the shapes remain recognizable in changing light. The result is a clean, dramatic Halloween accent that works with both rustic and modern exterior styles.
Mummy Tree Wrap
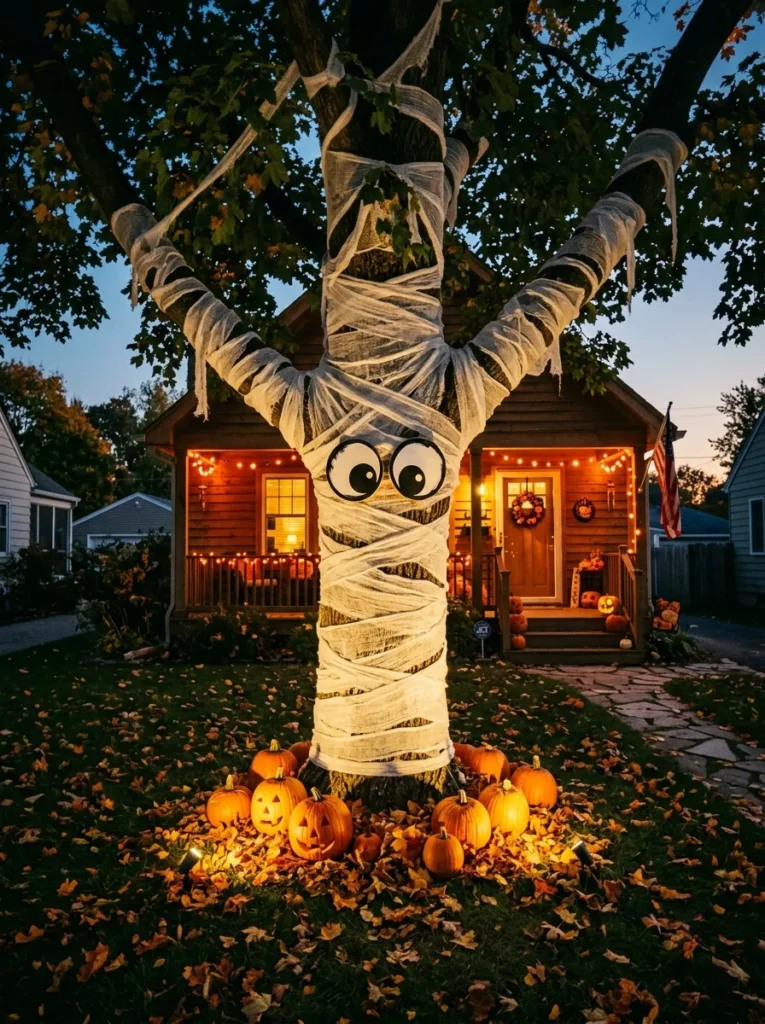
- Wrap a sturdy tree trunk with strips of white fabric.
- Add oversized eyes between the fabric layers.
- Keep the wrapping loose enough to avoid damaging bark.
- Use removable materials that can be taken down easily.
Give an ordinary tree a spooky makeover by turning its trunk into a giant outdoor mummy. Use long strips of white fabric, gauze, or old light-colored sheets and wrap them around the trunk in loose, overlapping layers. Leave small gaps between sections so the darker bark shows through and creates texture. Add a pair of large cartoon-style eyes near the middle for an instantly recognizable face. This idea works especially well with mature trees because the natural trunk shape provides height and structure without requiring a separate freestanding prop.
Avoid wrapping too tightly around living bark, and remove the fabric after Halloween so moisture does not remain trapped against the tree. Keep the lower section clear if the tree sits beside a walkway or driveway. A few pumpkins around the base can give the mummy a defined focal point and add warm seasonal color. For evening displays, aim a soft outdoor light upward from several feet away. The upward glow highlights the fabric layers and makes the tree visible from the street without requiring bright or complicated lighting.
Haunted Mailbox
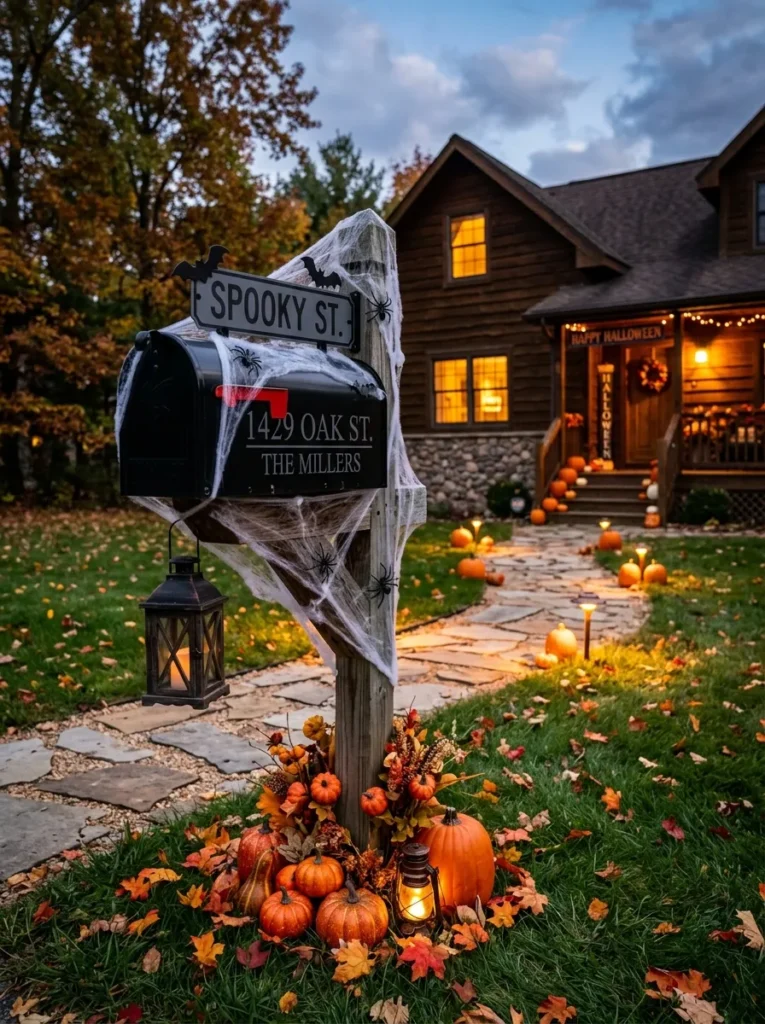
- Transform the existing mailbox into a miniature Halloween prop.
- Add removable black, orange, and gray decorative details.
- Surround the post with leaves, pumpkins, or faux cobwebs.
- Keep the mailbox opening and handle completely accessible.
Your mailbox can become a small but memorable part of the Halloween display with a few removable details. Wrap the post with faux spiderwebs, add a lightweight black cat or bat cutout, and place two or three miniature pumpkins around the base. A coat of removable decorative material can change the mailbox’s appearance without permanently altering it. Keep the design concentrated around the sides and post so the door, handle, flag, and mail slot remain completely usable. This approach is ideal when you want your decorations to begin at the curb and continue naturally toward the front entrance.
Choose a limited palette of black, orange, white, and weathered gray so the mailbox connects visually with the rest of the yard. Small battery lights can highlight the base after dark, but avoid anything that obstructs visibility for people delivering mail. If you use faux cobwebs, secure loose sections carefully so they do not blow into neighboring areas. I’ve noticed that decorating smaller outdoor features creates a more cohesive look because the Halloween theme feels intentional from the moment someone approaches the property.
Potion Bottle Cluster
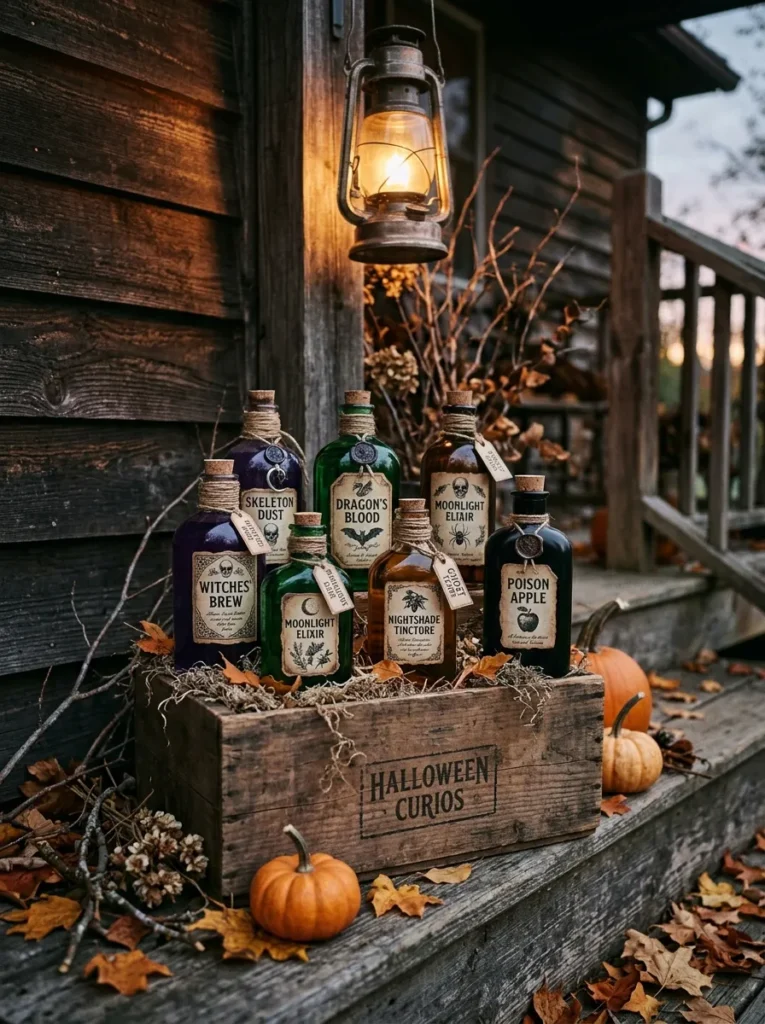
- Repurpose plastic bottles as oversized outdoor potion props.
- Use dark glass-style colors with simple handmade labels.
- Group bottles beside pumpkins, crates, or porch steps.
- Choose sealed containers when displaying them outside.
Create a miniature witchy display by turning recycled bottles and containers into colorful potion props. Choose plastic bottles in different shapes and cover them with dark green, purple, amber, or black materials to create a glass-like appearance. Add simple handmade labels using cream or aged-looking paper, then arrange the bottles on a wooden crate, tray, or small outdoor table. Grouping them at different heights gives the arrangement depth and makes even a small collection look substantial. The varied colors also introduce visual interest without requiring a large number of decorations.
Keep the bottles sealed if they will be exposed to rain, and avoid placing them where children or pets could easily knock them over. Add dried branches, faux moss, pumpkins, or a small lantern around the cluster to create a layered composition. Position the display near porch steps or beside the front door where it can be viewed easily. Warm lighting works particularly well with amber and purple tones, making the bottles appear richer after sunset. This small prop collection can complement larger yard decorations while giving the entrance a handcrafted Halloween finishing touch.
Scarecrow Porch Guard
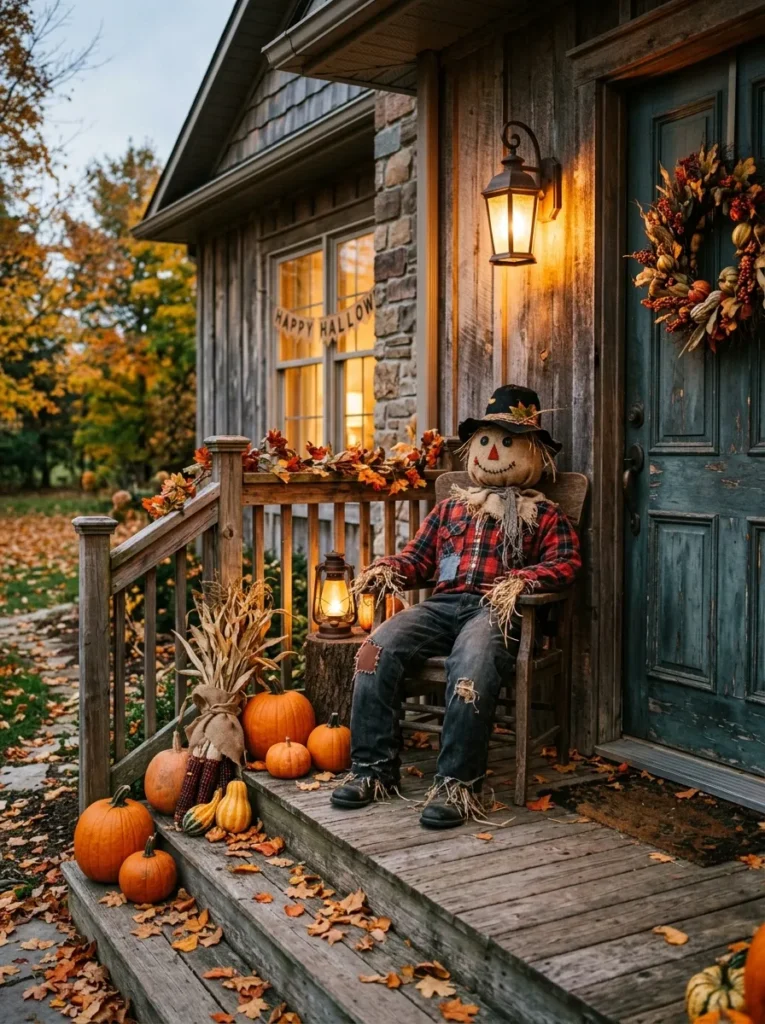
- Build a simple scarecrow from old clothes and straw.
- Position it beside the entrance as a focal point.
- Choose muted fabrics for an aged autumn appearance.
- Secure the figure firmly against wind and rain.
A handmade scarecrow can give your porch an instant Halloween focal point while blending naturally with autumn decorations. Fill an old shirt and pair of pants with straw, shredded paper, or another lightweight material, then secure the pieces around a simple wooden frame. Add a burlap or fabric head with a painted face and finish it with a worn black hat. Position the figure beside the porch steps or near the entrance where it can be seen easily. The relaxed shape makes the display feel homemade and welcoming rather than overly theatrical.
Choose fabrics in muted brown, cream, gray, rust, and faded plaid so the scarecrow works naturally with pumpkins and fall foliage. Keep the figure away from door-swing areas and busy walkways, and anchor the frame securely if your yard experiences strong wind. A small lantern beside its feet can provide a warm evening glow and emphasize the textures of burlap and straw. In my experience, combining one larger character with smaller decorations around it creates a stronger focal point than filling the porch with many equally sized props.
Raven Branches
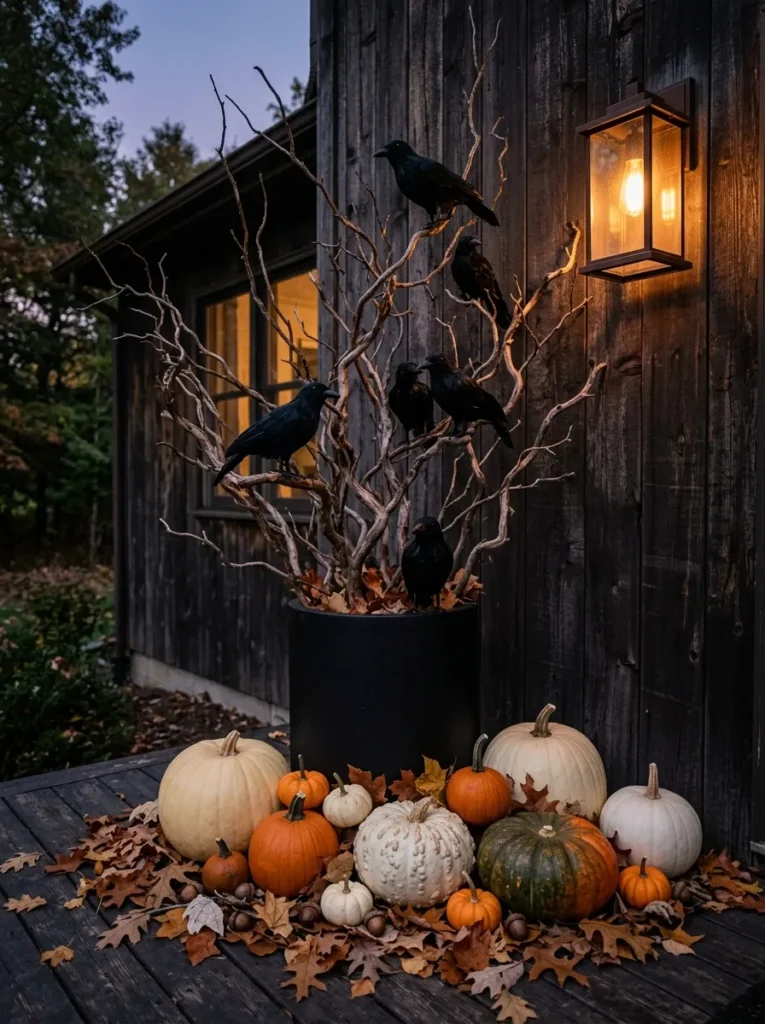
- Arrange bare branches in a sturdy outdoor container.
- Add black faux ravens for dramatic vertical height.
- Surround the base with pumpkins and autumn leaves.
- Use weather-resistant materials for longer outdoor display.
A cluster of bare branches with perched black ravens can add height and drama without overwhelming a small yard. Collect sturdy fallen branches or use weather-resistant decorative limbs, then arrange them in a heavy planter or weighted container. Secure several faux ravens along the branches, placing them at different heights and angles so the composition feels natural. The dark birds stand out beautifully against a lighter exterior wall or autumn foliage. This setup works particularly well beside a porch because it draws the eye upward while keeping most of the floor area open.
Choose branches with interesting twists and varied thicknesses to create a more sculptural arrangement. A black planter can make the base visually disappear at night, while pumpkins around it introduce warm seasonal color during daylight. Use a heavy container or concealed weight so the arrangement stays stable outdoors. A nearby lantern or soft spotlight can create gentle shadows across the branches after sunset. I’ve noticed that this type of vertical display photographs especially well because the branches create strong lines and the ravens provide small, recognizable focal points throughout the composition.
Ghostly Porch Drapes
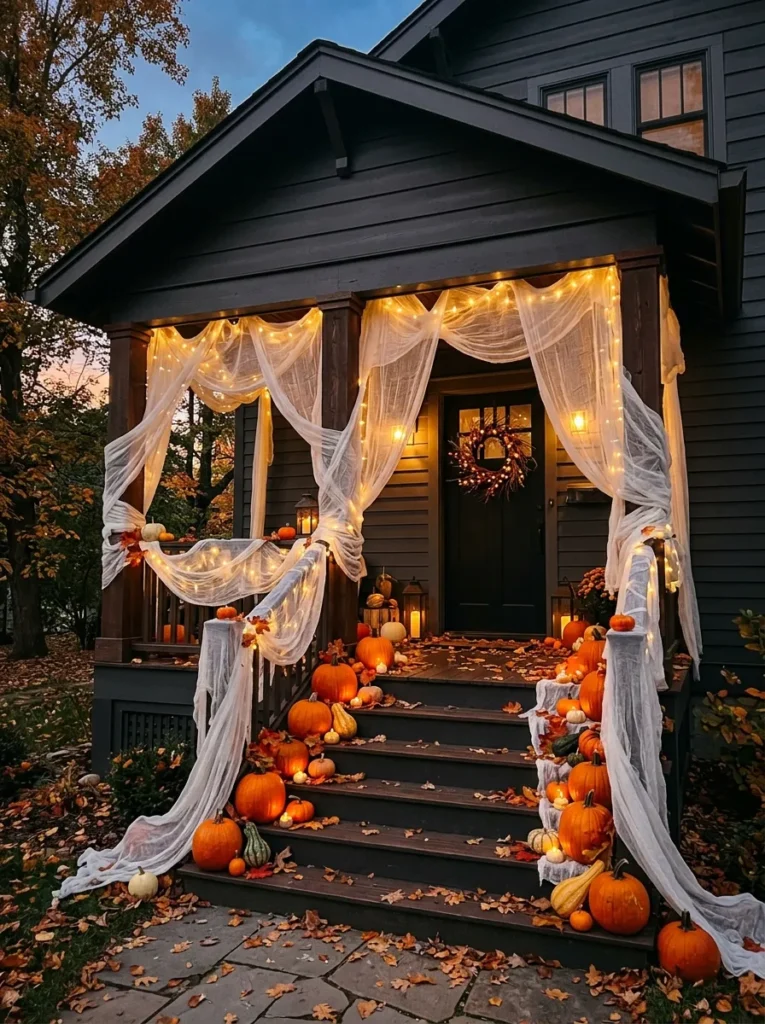
- Hang white fabric around porch railings or columns.
- Layer different lengths for soft movement and texture.
- Add subtle lighting behind the fabric at night.
- Keep entrances and handrails completely unobstructed.
Flowing white fabric can transform a basic porch into a soft, ghostly Halloween backdrop with almost no permanent changes. Drape lightweight sheets, gauze, or weather-resistant fabric around porch columns, railings, and selected corners. Use different lengths to create uneven layers that move gently outdoors and add texture. Keep the fabric concentrated around the edges rather than covering the entire porch. This preserves the home’s architectural details while creating a pale contrast against darker walls, railings, and evening shadows. The result feels atmospheric without requiring complicated construction or oversized decorations.
For nighttime displays, place warm LED string lights behind selected sections so the fabric catches a subtle glow. Avoid open flames near hanging materials, and secure every loose edge with clips or ties designed for outdoor use. Keep stairs, doorways, handrails, and walking routes completely clear. Pair the drapes with pumpkins, black lanterns, or a few branches for stronger visual contrast. This simple backdrop can also make smaller decorations stand out more clearly, giving the entire porch a coordinated appearance while keeping the setup inexpensive, flexible, and easy to remove after Halloween.
Conclusion
A spooky yard doesn’t need an enormous budget or complicated projects to make a lasting impression. With handmade ghosts, glowing pumpkins, creepy silhouettes, and other simple details, DIY Halloween decorations outdoor can turn an ordinary space into a memorable seasonal display. Start with one idea that fits your yard, then add a few smaller accents for depth and personality. I’ve seen how small decorative changes can completely transform an outdoor space when they are arranged thoughtfully. Save this post on Pinterest so you can return to your favorite ideas, try them in your own space, and share the inspiration with friends who love Halloween decorating too.