22 Halloween Hallway Ideas to Create a Spooky Vibe
Your hallway doesn’t have to stay an overlooked space this Halloween. A few clever details can turn it into the most memorable part of your home.
These halloween hallway ideas are designed to help you transform plain walls, narrow walkways, doorways, and empty corners into inviting spooky displays. From floating witch hats and creepy portraits to glowing lanterns, pumpkins, bats, and gothic accents, there are options for every decorating style and space. You don’t need a huge budget or a wide hallway to create an impressive seasonal look. In my experience, thoughtful placement makes a bigger difference than simply adding more decorations. These ideas will help you create a hallway that feels cohesive, atmospheric, and fun while still remaining practical for everyday movement.
Spooky Black Gallery
- Create a dramatic focal point without making the hallway feel crowded.
- Use black frames to give ordinary walls a coordinated Halloween look.
- Add warm lighting so the dark decor still feels inviting.
- I’ve noticed gallery-style displays work especially well in narrow hallways because they use vertical wall space efficiently.
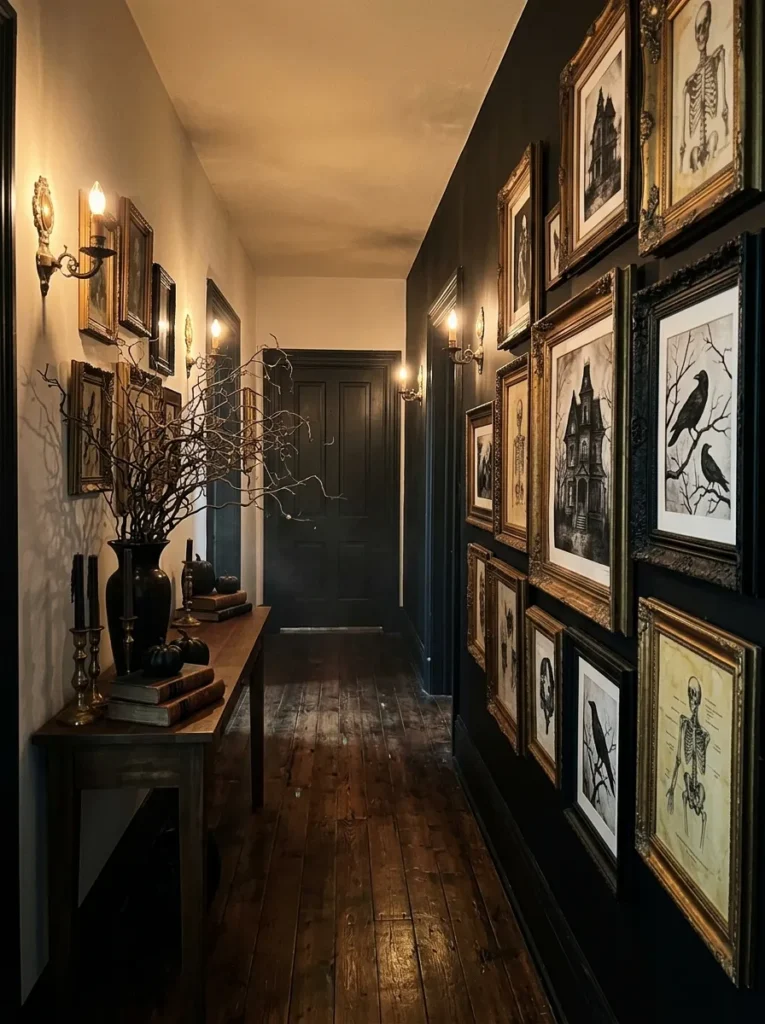
Spooky artwork can turn an overlooked hallway into a striking Halloween display with very little floor space. Start with a collection of black frames in different sizes, then fill them with vintage portraits, haunted house prints, ravens, skeleton illustrations, or simple monochrome artwork. Arrange the frames along one wall rather than spreading decorations throughout the passage. Black, charcoal, ivory, and muted gray create a sophisticated palette that feels eerie without becoming messy. Add a few warm wall lights or battery candles nearby to soften the darker tones and make the artwork visible after sunset.
For a stronger visual effect, keep the floor and surrounding furniture relatively simple so the gallery wall remains the main attraction. A narrow console table can sit beneath the frames with a small black vase, dried branches, or a few miniature pumpkins. In my experience, mixing frame sizes makes a hallway display look collected rather than overly planned. Leave enough breathing room between pieces so guests can appreciate individual details while walking past. This approach works particularly well in rental homes because removable picture hooks can create a seasonal transformation without permanent changes to the walls.
Floating Witch Hats

- Hang lightweight witch hats from the ceiling to create an unexpected overhead display.
- Vary the hanging heights so the hallway feels layered and dimensional.
- Keep the walls simple because the ceiling decoration becomes the visual focus.
- Battery-powered lights inside selected hats can add a subtle nighttime glow.
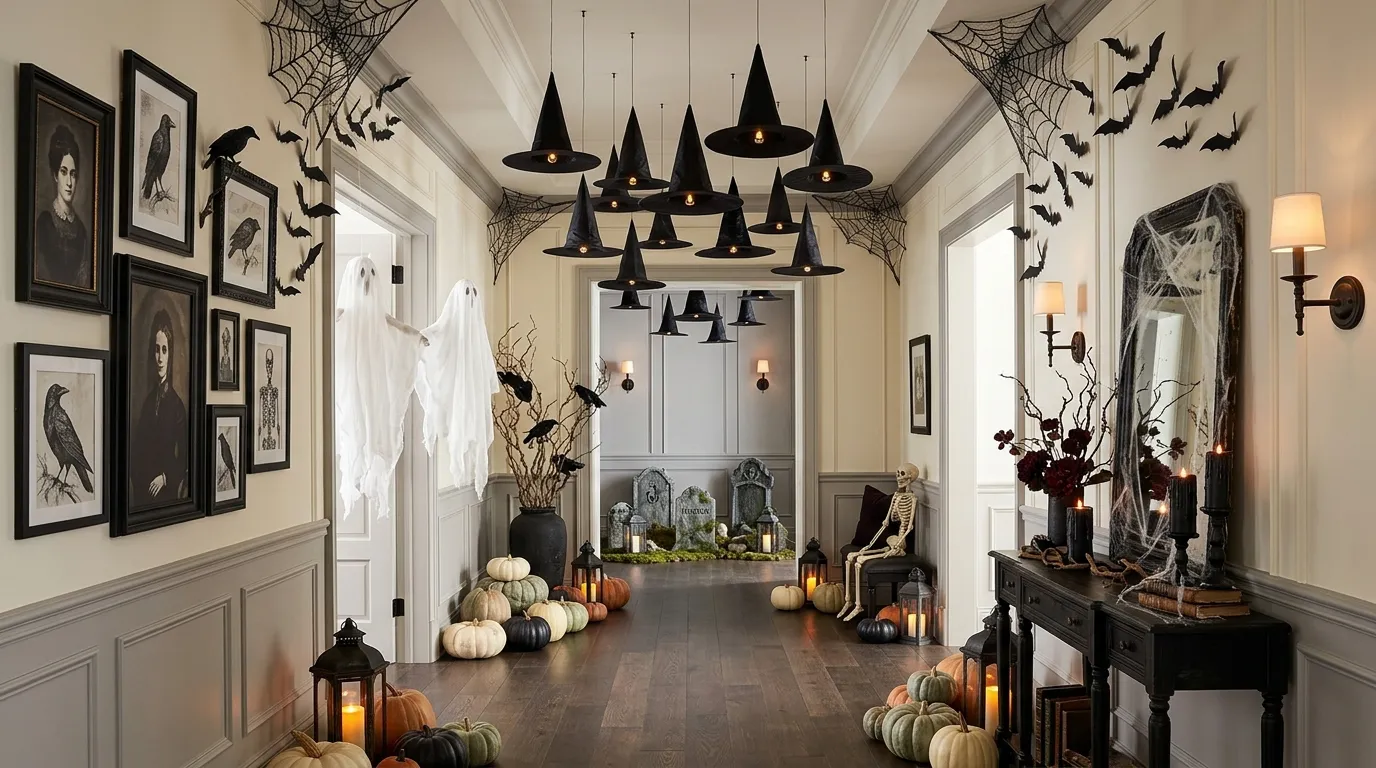
Floating witch hats instantly make an ordinary passageway feel playful, mysterious, and unmistakably Halloween-ready. Choose several black pointed hats in different sizes and suspend them from the ceiling with clear fishing line or thin transparent cord. Position them at varied heights along the hallway, keeping the lowest pieces comfortably above head level. The floating effect creates the illusion that the hats are suspended in midair while preserving valuable floor space. Pair them with warm white bulbs, small wall sconces, or dim ceiling lighting to create gentle shadows across the walls and ceiling.
This setup is especially useful when you want dramatic decoration without adding furniture to a narrow walkway. Keep the surrounding decor restrained, perhaps using a few black picture frames or tiny pumpkins along a console table. I’ve seen this work well in homes where floor space is limited because the visual interest moves upward instead of narrowing the passage. For safety, secure each hat firmly and keep cords away from light fixtures or walking areas. A few different hat shapes will also make the arrangement feel more natural and less like a uniform store display.
Creepy Portrait Wall
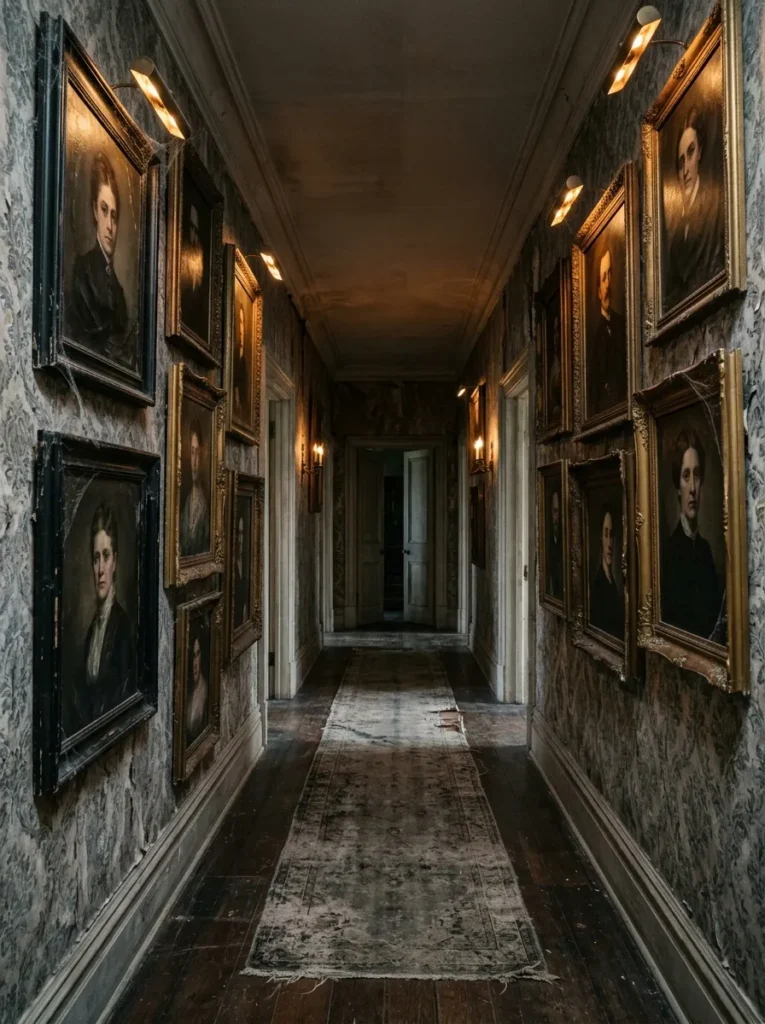
- Replace ordinary hallway artwork with eerie vintage-style portraits.
- Choose frames with distressed finishes for extra character and texture.
- Keep the portrait colors muted so the display feels cohesive.
- A small amount of warm lighting can make the faces appear more dramatic after dark.
A creepy portrait wall gives your hallway an instantly haunted-house character while keeping the decorating footprint surprisingly small. Choose vintage-inspired portraits featuring mysterious expressions, formal clothing, or slightly unsettling details, then place them inside aged gold, dark wood, or distressed black frames. Hang the artwork at eye level so guests notice the faces as they move through the space. A combination of portrait sizes adds visual rhythm, while muted browns, dusty cream, black, and deep gray keep the arrangement atmospheric rather than overly colorful or cartoonish.
The strongest Halloween hallway ideas often rely on one memorable visual feature, and unsettling portraits can provide exactly that. Add a slim picture light above the central artwork or use a nearby warm lamp to create gentle shadows around the frames. I’ve noticed that slightly uneven spacing can make a display feel older and more believable than perfectly aligned artwork. If you want a subtler look, choose portraits that appear elegant during daylight but become eerie under evening lighting. This makes the hallway feel transformed without requiring excessive props, clutter, or expensive seasonal decorations.
Black Spiderweb Corners
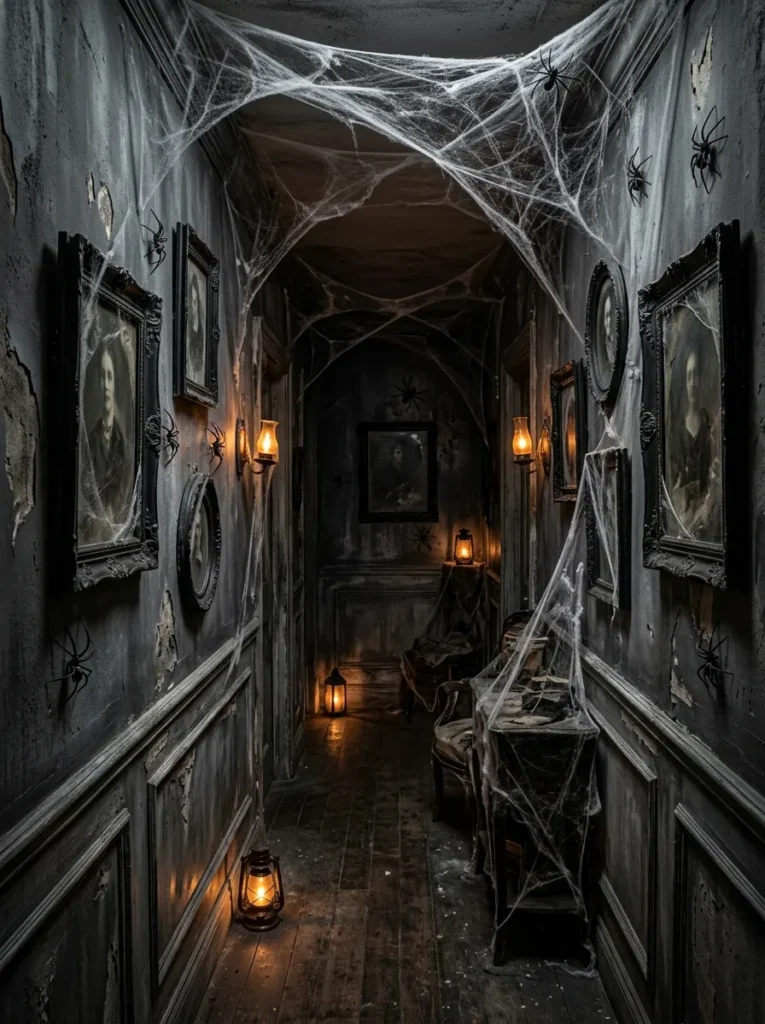
- Stretch oversized faux cobwebs across hallway corners for instant Halloween texture.
- Add a few realistic-looking spiders to make the webbing more convincing.
- Keep the center of the walkway clear so the decoration stays practical.
- Use soft lighting to emphasize the web texture without making the space feel harsh.
Few decorations create an immediate spooky effect as easily as oversized spiderwebs tucked into hallway corners. Pull lightweight faux cobweb material loosely across ceiling edges, doorway corners, picture frames, and the upper sections of the walls. Avoid making every surface equally covered because uneven placement looks more natural and gives the hallway a neglected haunted-house feel. Add several black or dark brown spiders at different heights, especially near corners where guests naturally look. White or gray webbing against darker walls creates strong contrast, while warm lighting helps reveal the fine strands without overwhelming the passage.
This setup works particularly well for narrow hallways because the decoration stays mostly around the edges instead of taking up valuable walking space. For a more polished arrangement, combine the webbing with a few black frames, dried branches, or small lanterns placed along a nearby console. In my experience, the trick is using less material than you initially think you need, then stretching it thinly for a more realistic appearance. If the webs look too dense, they can quickly become messy. A few carefully placed clusters usually create more atmosphere and stronger visual impact.
Ghostly Hanging Sheets
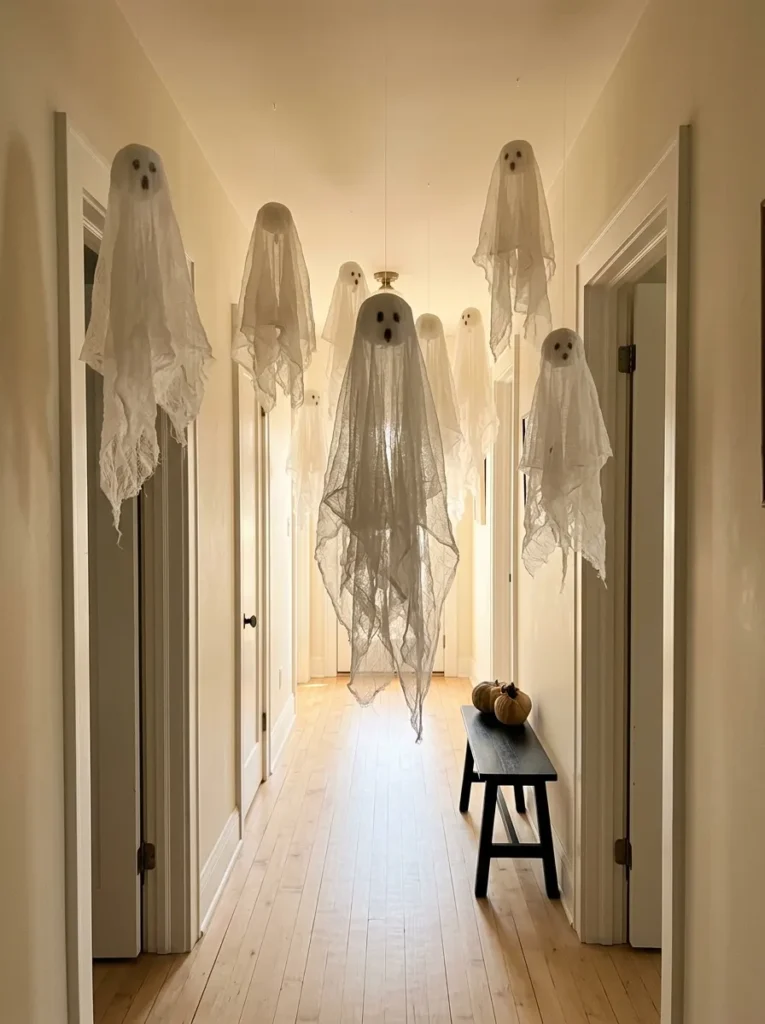
- Use lightweight white fabric to create floating ghost shapes along the hallway.
- Keep the fabric loose and flowing instead of tightly wrapping each figure.
- Add soft backlighting for a gentle glow around the ghostly forms.
- Choose washable or reusable materials if you plan to decorate every Halloween.
Ghostly hanging sheets can transform a plain hallway into a soft, floating Halloween scene with very simple materials. Use lightweight white muslin, gauze, or old cotton fabric to create loose ghost shapes suspended from the ceiling or doorway. Let portions of the fabric hang naturally so the figures appear airy rather than stiff. Keep the palette mostly white, cream, and pale gray, then add small dark facial details if desired. Warm backlighting or battery-powered candles positioned safely behind the fabric can create soft shadows and make the shapes stand out beautifully.
For homes with children or frequent foot traffic, keep every hanging piece high enough to avoid brushing against people as they walk through. A narrow hallway can handle several ghost forms if they are spaced apart rather than crowded together. I’ve noticed that slightly uneven heights make hanging decorations feel more playful and convincing. You can also place a small black bench, woven basket, or simple console beneath the display to ground the vertical arrangement. This is one of those easy seasonal updates that can look surprisingly polished when the fabric remains simple, clean, and intentionally positioned.
Pumpkin Lined Walkway

- Line the hallway edges with pumpkins in varied sizes for a classic seasonal display.
- Mix real and faux pumpkins to balance texture, weight, and convenience.
- Use muted orange, cream, black, and green for a more sophisticated palette.
- Keep pumpkins close to the walls so the walking path remains comfortable.
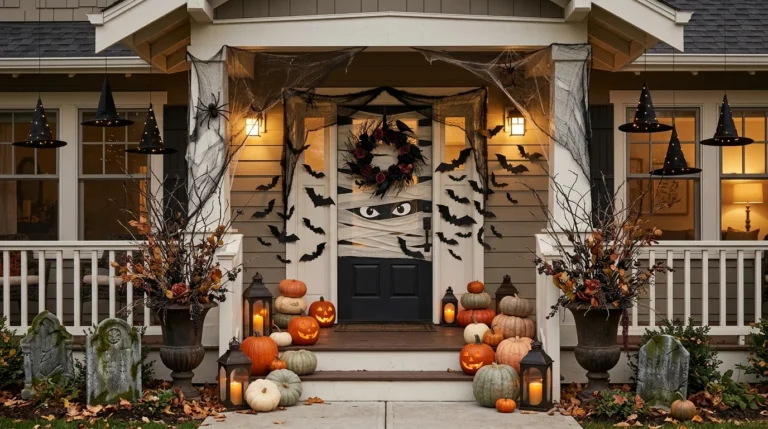
A pumpkin-lined walkway brings classic fall character into the hallway while creating a clear visual path through the home. Place pumpkins along both sides of the passage, using different shapes and sizes to prevent the arrangement from looking too uniform. Traditional orange pumpkins can be mixed with white, cream, pale green, or black varieties for a more modern Halloween palette. Position the largest pieces near corners or furniture and use smaller pumpkins between them. This layered arrangement adds depth while keeping the center of the hallway open and practical for everyday movement.
For an especially welcoming result, combine the pumpkins with a few lanterns, dried leaves, or simple branches placed along the edges. If real pumpkins are used indoors, choose firm, clean specimens and protect delicate flooring with small trays or mats. I’ve noticed that repeating one or two colors throughout the arrangement helps a long hallway feel connected rather than cluttered. This approach also works beautifully with existing autumn decor, so you do not need to completely redecorate. A simple row of carefully spaced pumpkins can make even a plain hallway feel intentionally styled for Halloween.
Haunted Mirror Display
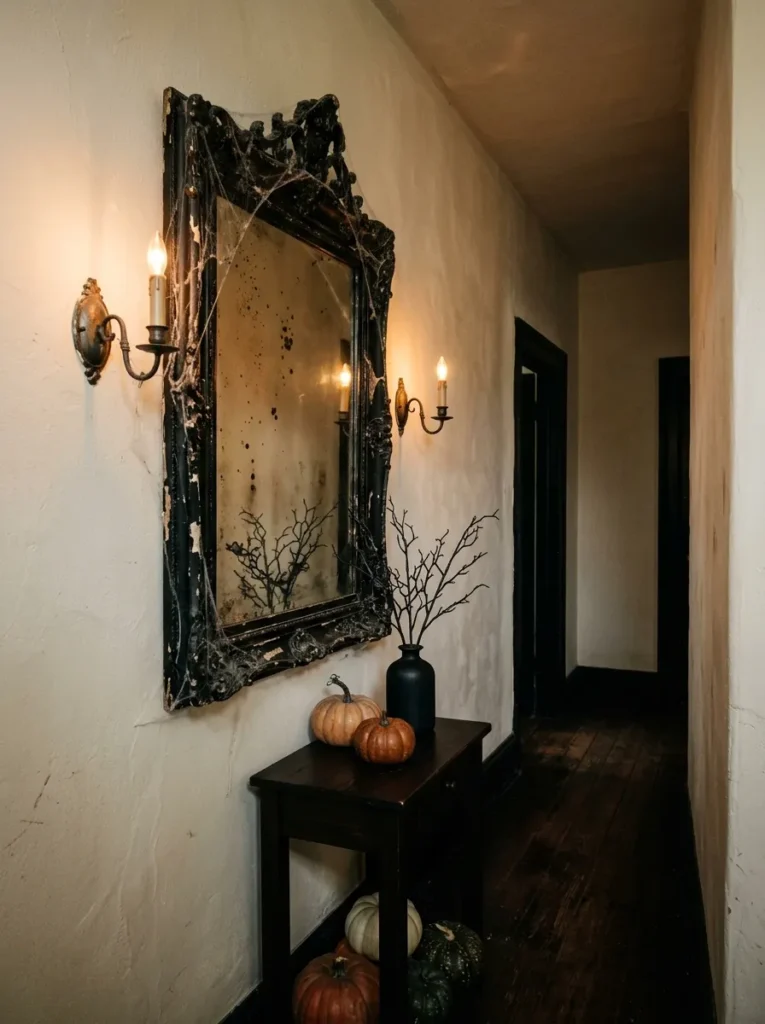
- Turn an ordinary hallway mirror into an eerie seasonal focal point.
- Add removable dark trim or faux cobwebs around the frame.
- Use dim lighting to create mysterious reflections without making the space uncomfortable.
- Keep the mirror functional so the decoration adds style without sacrificing everyday usefulness.
A haunted mirror can make a hallway feel mysterious without requiring much space or expensive decoration. Start with an existing wall mirror, then surround its frame with thin faux cobwebs, black ribbon, or a few artificial branches. A distressed black frame works especially well, while a vintage gold frame can create a more dramatic haunted-mansion appearance. Keep the glass mostly clear so the mirror remains useful. Add a small warm wall light nearby, allowing gentle illumination to reflect across the surface and create depth without making the hallway feel excessively dark or theatrical.
For an extra eerie effect, place a small decorative lantern, black vase, or cluster of miniature pumpkins beneath the mirror if space allows. Avoid covering too much of the reflective surface because the mirror itself should remain the centerpiece. In my experience, subtle details often look more sophisticated than covering every inch with Halloween props. This approach works beautifully in apartments and smaller homes because the mirror can make a narrow hallway appear more spacious while the surrounding decorations establish the seasonal mood. Removable materials also make cleanup much easier when Halloween is over.
Raven Branch Arrangement
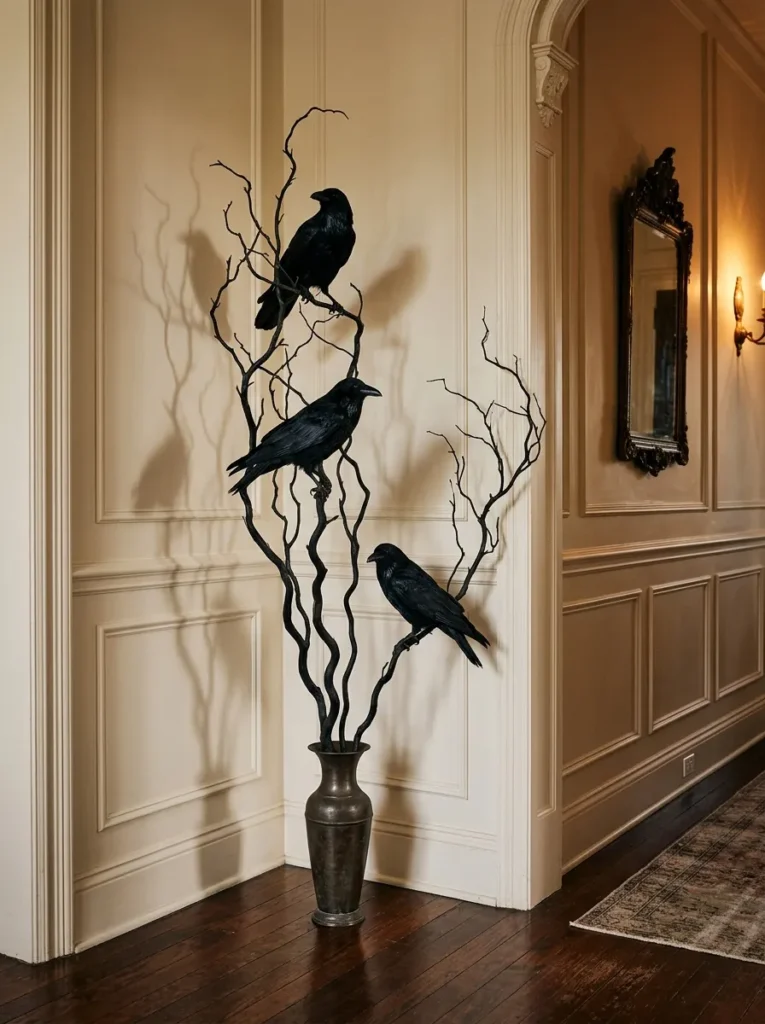
- Bring height and natural texture into the hallway with dark decorative branches.
- Add faux ravens at different positions for a recognizable Halloween detail.
- Use a tall floor vase to keep the arrangement contained and tidy.
- Combine matte black branches with warm lighting for contrast and depth.
A tall raven branch arrangement brings dramatic height to a hallway while using surprisingly little floor space. Place twisted faux branches inside a narrow black, charcoal, or antique-style vase, then attach several artificial ravens at different points along the stems. Keep the branches slightly uneven so the arrangement feels organic rather than perfectly symmetrical. Black branches work beautifully against cream, beige, gray, or muted green walls. A nearby warm lamp or ceiling light can cast interesting shadows across the wall, giving the display more dimension while keeping the overall look sophisticated.
This idea works particularly well at the end of a hallway because it creates a strong visual destination without blocking the walking route. Choose a tall, slim container that remains stable and place it against a wall or beside a console rather than directly in the center. I’ve noticed that adding just three or four ravens usually creates enough Halloween character without making the display feel crowded. You can also keep the branches after Halloween and remove the birds, making this a flexible seasonal arrangement rather than a decoration used for only one week.
Red Candlelit Passage

- Use deep red accents to create a darker, more dramatic hallway atmosphere.
- Arrange flameless candles along a console or wall shelf for layered lighting.
- Mix candle heights to create movement and visual depth.
- Choose battery-operated lights for a safer indoor Halloween setup.
A candlelit hallway can create an instantly dramatic Halloween atmosphere, especially when deep red accents replace the usual bright orange decorations. Arrange flameless pillar candles of different heights along a narrow console, wall shelf, or secure ledge, keeping them away from fabrics and high-traffic areas. Add a few dark red roses, black candle holders, or antique-style books to reinforce the gothic palette. Warm amber light against charcoal, cream, or burgundy surroundings creates soft shadows that make the hallway feel richer and more atmospheric without requiring elaborate props.
Among the most effective halloween hallway ideas, controlled lighting can make a bigger difference than adding more decorations. Keep the lighting concentrated in a few intentional areas rather than placing identical candles everywhere. This gives the passage a layered appearance and prevents it from feeling visually flat. Battery-powered candles are especially practical because they eliminate open flames and can be positioned more freely. For homes with children or pets, secure every decorative piece carefully and keep the walkway unobstructed. The finished effect should feel moody and inviting while remaining comfortable for everyday movement.
Skeleton Welcome Scene
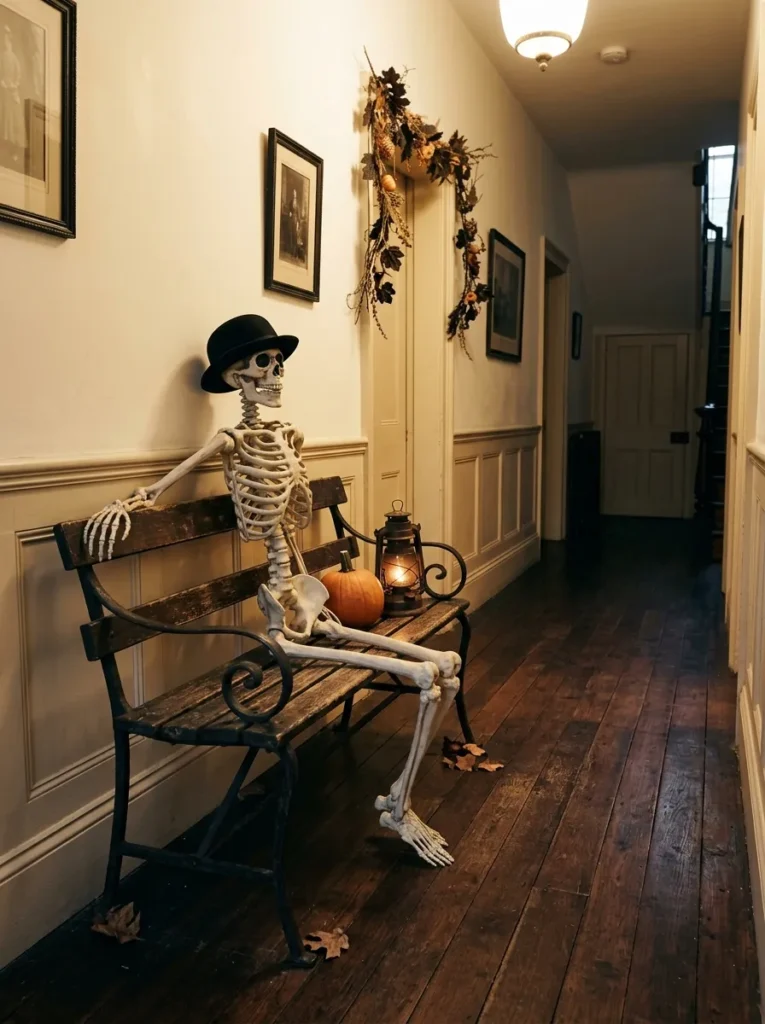
- Position a decorative skeleton where guests naturally notice it when entering.
- Add a simple chair or bench to create a playful staged scene.
- Use neutral Halloween colors so the skeleton remains the main focal point.
- Secure the figure carefully if the hallway receives regular foot traffic.
A skeleton welcome scene can turn an ordinary hallway into a playful Halloween moment that immediately catches attention. Place a seated or standing skeleton beside a narrow bench, small chair, or console table, then add a few simple props such as a black hat, lantern, or miniature pumpkin. Keep the surrounding decorations restrained so the figure remains the star. Neutral walls, dark furniture, and warm lighting create enough contrast to make the skeleton visible without turning the hallway into an overly crowded display.
The best placement is usually near an entry point, hallway corner, or wider section where people naturally pause. Make sure the skeleton does not narrow the walking path, especially if the hallway connects frequently used rooms. I’ve noticed that giving the figure one or two believable accessories makes the display feel much more intentional than surrounding it with random decorations. A small sign, vintage suitcase, or dark floral arrangement can add personality without overwhelming the setup. This is a fun option for families because the scene can feel spooky, humorous, or slightly mischievous depending on the accessories.
Witch Broom Cluster

- Lean several decorative brooms together to create an easy vertical display.
- Choose different broom shapes and natural materials for added texture.
- Place them beside a console or in an unused hallway corner.
- Add a small black hat or lantern to strengthen the witch-inspired theme.
A cluster of witch brooms is an easy way to add Halloween personality without covering the entire hallway in decorations. Gather several rustic-looking brooms made from straw, twigs, raffia, or dark natural fibers, then lean them together against a wall or place them inside a tall floor container. Vary the heights and textures so the arrangement feels collected rather than identical. Black, brown, tan, and muted gray create a natural palette that works especially well with wood flooring, neutral walls, and simple autumn decorations.
This arrangement is particularly useful for awkward hallway corners that are too small for furniture but still need visual interest. Place the broom cluster beside a narrow console or near the end of the passage, making sure the handles and bristles stay firmly within the corner. In my experience, natural textures make Halloween decorations feel warmer and less plastic-looking. A black witch hat, small lantern, or handful of dried branches can complete the display without adding clutter. After Halloween, the brooms can remain as rustic fall decor, making this idea useful beyond the holiday itself.
Eyeball Light Trail

- Create a playful hallway path using oversized eyeball decorations.
- Combine glowing pieces with darker surroundings for strong visual contrast.
- Keep the arrangement along walls or above furniture rather than underfoot.
- Use removable battery lights for an easy seasonal installation.
A glowing eyeball trail adds playful Halloween energy while giving the hallway a strong visual direction. Use lightweight eyeball decorations with small LED lights, then arrange them along one wall, above a console, or around door frames. White surfaces with dark pupils create instant contrast, while subtle purple, red, or cool-white illumination can make the display feel more theatrical. Keep the glowing elements spaced apart instead of placing them in a dense row. This creates a clearer visual rhythm and prevents the hallway from looking like a crowded party store display.
For a more sophisticated result, pair the eyeballs with mostly black and charcoal decorations so the bright details become the focal points. Avoid placing illuminated pieces directly on the floor where they could become tripping hazards or receive accidental knocks. I’ve noticed that repeating one unusual element throughout a hallway can make separate decorations feel like one coordinated design. If the lights are battery-operated, installation is simple and temporary. This setup is especially fun for families who prefer a spooky look with a playful edge rather than a genuinely frightening atmosphere.
Gothic Lace Panels

- Hang black lace panels to add texture without taking up floor space.
- Choose lightweight fabric that allows some wall color to remain visible.
- Pair the lace with warm lighting for delicate, dramatic shadows.
- Use removable hooks if you want an easy seasonal setup.
Black lace panels can give a hallway an elegant gothic character without making the space feel overly decorated. Hang lightweight lace along selected wall sections, doorway openings, or beneath existing artwork rather than covering every surface. Intricate floral or spiderweb patterns work especially well because they create visual texture while allowing the wall underneath to remain partially visible. Combine black lace with charcoal, cream, or muted burgundy accents for a sophisticated palette. Warm wall lighting can highlight the pattern and cast delicate shadows across the surrounding surfaces.
This treatment works particularly well when you want Halloween decor that feels refined rather than cartoonish. Keep the fabric slightly gathered instead of pulling it completely flat, which creates natural folds and makes the material look richer. In my experience, using lace on only one or two sections gives a stronger result than covering the entire hallway. Add a vintage mirror, dark frame, or small console beneath the fabric to reinforce the gothic style. Lightweight panels are also easy to remove and store, making them practical for seasonal decorating.
Vintage Halloween Signs

- Use aged signs to give the hallway a collected, old-fashioned Halloween look.
- Mix typography, distressed wood, and antique finishes for visual variety.
- Keep signs at different heights to create a natural gallery arrangement.
- Choose a limited color palette so the display remains coordinated.
Vintage Halloween signs can instantly make a hallway feel like part of an old-fashioned seasonal display. Look for distressed wood plaques, antique-style metal signs, faded lettering, or handmade-looking pieces in black, cream, brown, and muted orange. Arrange several signs at different heights along one wall, leaving enough space between them for each piece to remain readable. Designs featuring classic Halloween symbols, old shop-style graphics, or simple seasonal wording can add personality without requiring large props or furniture.
A coordinated sign collection is especially useful when the hallway already has existing artwork that you do not want to remove. Simply add two or three seasonal pieces around the existing decor, then repeat one or two colors throughout the arrangement. I’ve noticed that distressed textures make seasonal displays feel more authentic because small imperfections prevent everything from looking brand new. For narrow hallways, prioritize vertical wall space rather than adding objects to the floor. This keeps the passage functional while still giving visitors plenty of visual details to discover as they walk through.
Black Balloon Arch
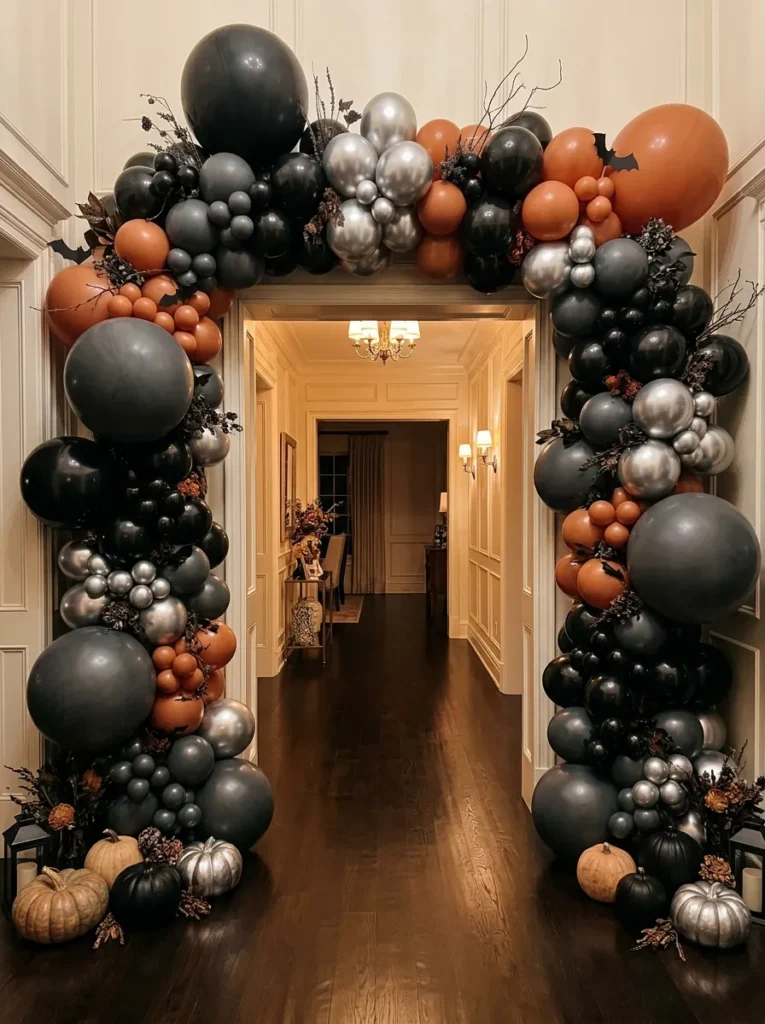
- Frame a hallway entrance with black and gray balloons for instant visual impact.
- Mix matte and glossy finishes to create texture and dimension.
- Add a few metallic silver or muted orange balloons for subtle contrast.
- Keep the arch attached securely so it does not obstruct the passage.
A black balloon arch can create a dramatic Halloween entrance while keeping the decorating concept simple and highly visual. Build the arrangement around a hallway opening using mostly matte black and charcoal balloons, then add a few glossy, metallic, or muted orange pieces for contrast. Varying balloon sizes makes the arch look fuller and more professionally styled. Keep the center of the opening open enough for comfortable movement, especially if the hallway is frequently used. Warm overhead lighting can soften the dark colors and make the balloons catch subtle highlights.
This is one of the easiest ways to make a hallway feel transformed for a Halloween gathering because the decoration immediately frames the space. If you are decorating for a party, the arch can also create a natural photo spot without requiring additional furniture. Secure the balloons with removable hooks, balloon strips, or another suitable support system rather than attaching them directly to delicate surfaces. In my experience, limiting the palette to three or four colors keeps a large balloon installation looking intentional. Add a few small pumpkins nearby if you want to connect the arch with the rest of the hallway decor.
Moonlit Bat Swarm

- Create a flying bat effect that draws the eye along the hallway.
- Use different bat sizes to make the arrangement feel more natural.
- Place the swarm near the ceiling so the walkway remains completely clear.
- Combine black silhouettes with soft lighting for stronger contrast.
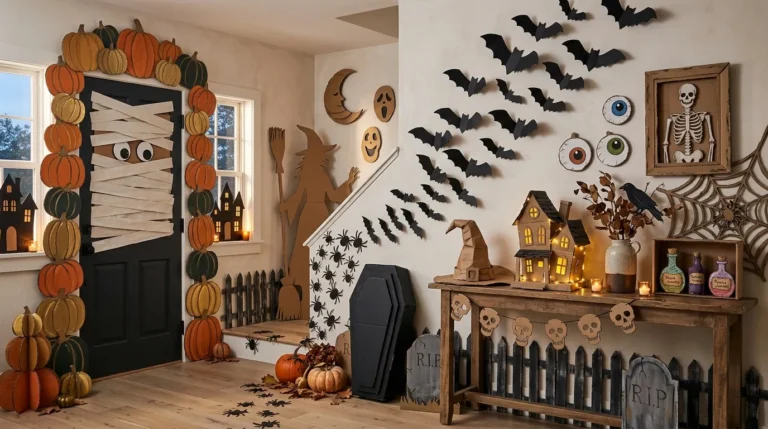
A moonlit bat swarm can make a plain hallway feel instantly more dynamic by drawing attention upward. Cut or purchase lightweight black bat silhouettes in several sizes, then arrange them in a loose formation that gradually spreads along the wall or ceiling. Start with fewer bats near one end and increase the number toward the focal point for a sense of movement. Against cream, pale gray, or softly colored walls, the black shapes create crisp contrast. Warm lighting can highlight the silhouettes while keeping the rest of the hallway comfortably illuminated.
The arrangement works best when the bats are not perfectly aligned, because slight changes in angle and spacing make them appear more natural. Use removable adhesive suitable for your wall finish, especially if the decoration will only stay up for a few weeks. I’ve noticed that a bat swarm looks especially effective when it travels toward a mirror, doorway, or decorative light fixture, giving the hallway a visual destination. Keep the lower walls relatively simple so the overhead display remains dominant. This idea adds plenty of Halloween character without taking up any useful floor space.
Misty Graveyard Corner
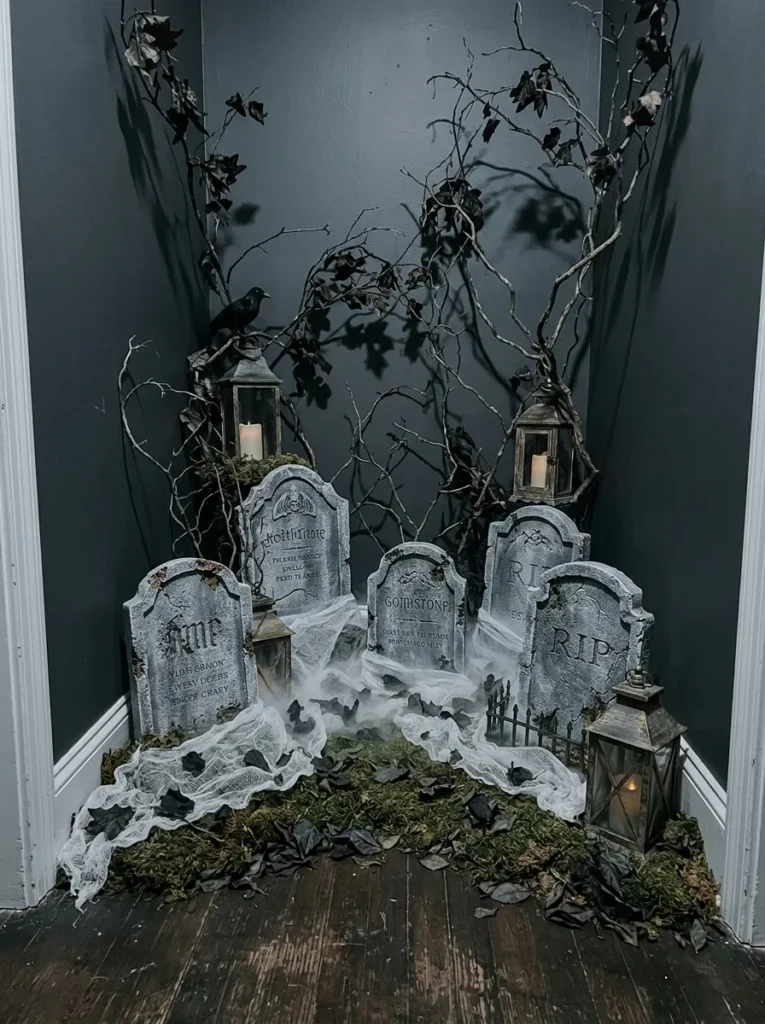
- Turn an unused hallway corner into a miniature indoor graveyard scene.
- Use lightweight faux tombstones to create depth without heavy furniture.
- Add artificial moss and bare branches for natural-looking texture.
- Keep the display contained so the main walking path stays open.
A miniature graveyard corner can turn an unused section of hallway into a memorable Halloween focal point. Place lightweight faux tombstones against one wall, then surround them with small artificial moss pieces, twisted branches, dark leaves, and a few weathered lanterns. Choose gray, charcoal, stone, and muted green tones so the arrangement feels aged rather than brightly decorative. If the hallway has enough width, position the tallest tombstone toward the back and smaller pieces in front to create depth. Keep the entire scene close to the wall so the walkway remains comfortable.
To suggest a misty atmosphere without creating actual moisture indoors, use soft white fabric or translucent gauze around the base of the display. A cool-white or dim purple light positioned safely behind the scene can create gentle shadows and make the tombstones stand out. In my experience, limiting the display to one corner makes it feel more like a deliberate vignette than a collection of random Halloween props. This setup is especially effective at the end of a hallway because it creates a strong destination point that guests naturally notice as they approach.
Witchy Apothecary Shelf
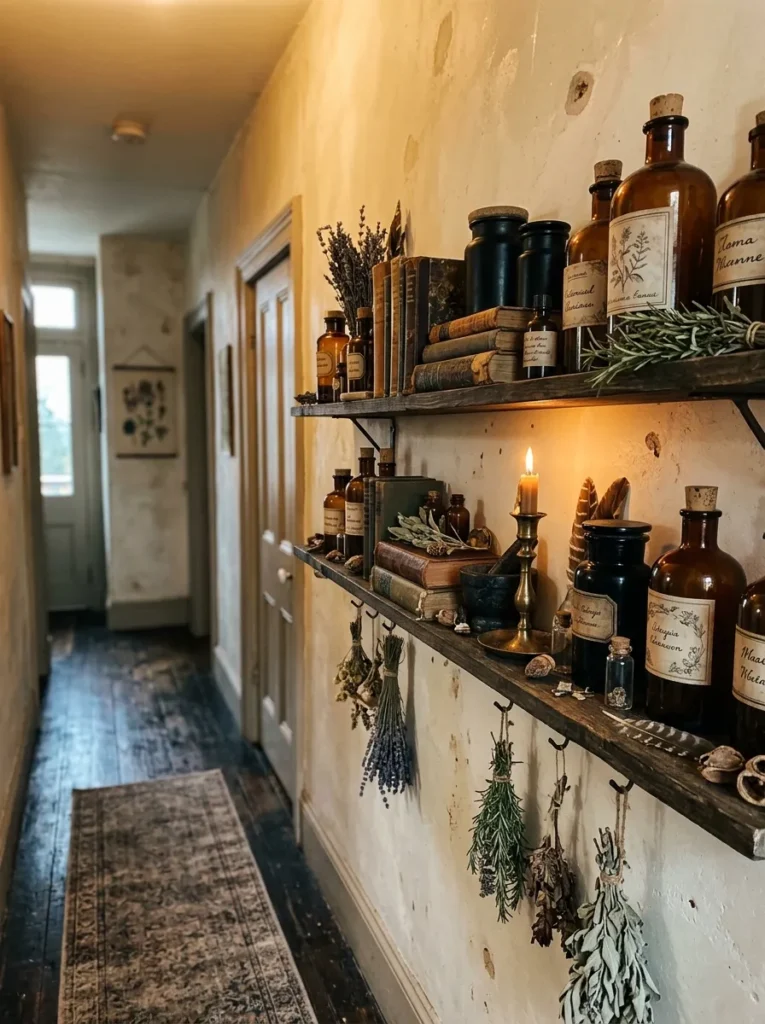
- Style a narrow hallway shelf with bottles, herbs, and vintage-inspired containers.
- Use dark glass, amber jars, and aged labels for authentic visual texture.
- Group objects at different heights to make the shelf feel collected.
- Leave enough empty space so small details remain easy to see.
A witchy apothecary shelf can give your hallway the charm of an old magical shop without requiring much room. Use a narrow floating shelf or existing console surface to display amber bottles, dark glass jars, dried herbs, small books, wooden spoons, and vintage-style containers. Choose labels with simple botanical or mysterious designs, then combine brown, black, cream, and muted green tones. Group items in small clusters rather than spreading everything evenly across the shelf. This creates visual layers and makes the display feel naturally collected instead of overly arranged.
Keep taller bottles toward the back and shorter pieces toward the front so each object remains visible. A small brass candlestick, dark vase, or bundle of dried stems can add another layer of texture without making the shelf crowded. These kinds of halloween hallway ideas work especially well in homes where floor space is limited because the decoration uses vertical surfaces. I’ve noticed that repeated glass textures catch warm hallway lighting beautifully, creating tiny highlights that make the arrangement feel richer. Secure fragile bottles and containers if the shelf is positioned in a busy family hallway.
Coffin Doorway Frame
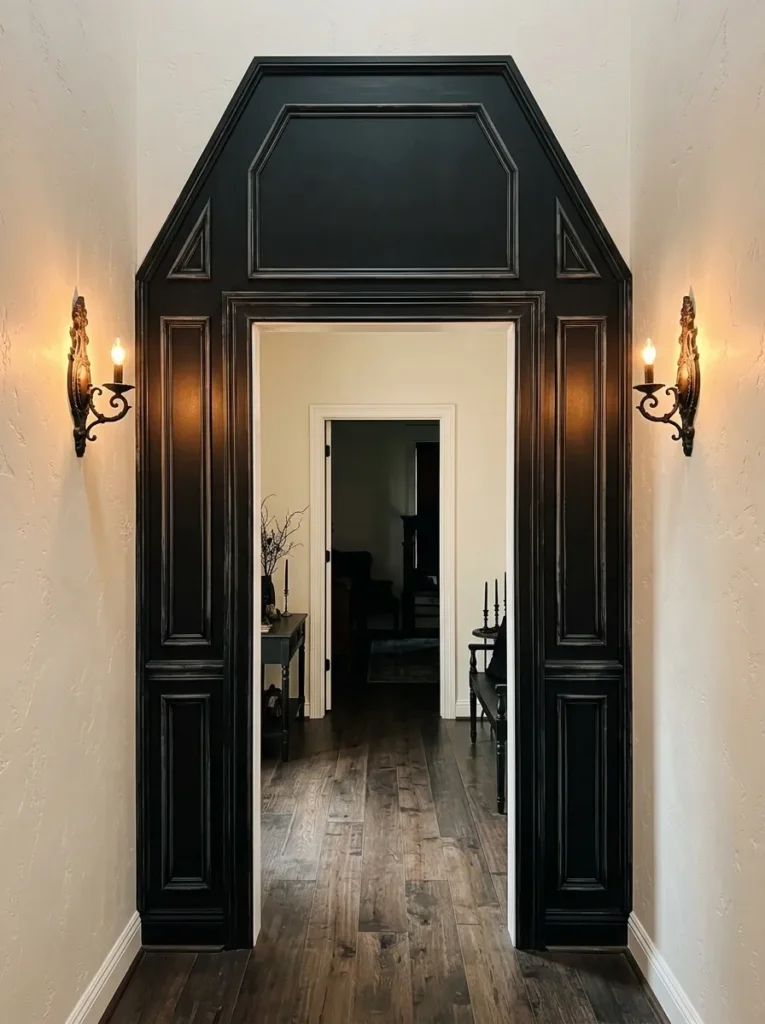
- Frame a doorway with a dramatic coffin-inspired Halloween structure.
- Use lightweight materials so the decoration remains easy to install and remove.
- Keep the central doorway completely clear for comfortable movement.
- Add subtle lighting to emphasize the unusual shape after dark.
A coffin-inspired doorway frame creates a bold Halloween statement without requiring decorations throughout the entire hallway. Use lightweight foam board, cardboard, or another removable material to create angled coffin-like panels around a doorway. Paint the pieces matte black, charcoal, or weathered gray, then add subtle distressed details for an aged appearance. Keep the opening itself completely unobstructed so people can comfortably pass through. Warm lighting from nearby sconces or a small lantern can emphasize the unusual silhouette and make the structure stand out after sunset.
This setup works especially well at the entrance to a hallway because it creates an instant transition between ordinary rooms and the decorated seasonal space. For a less dramatic version, use only the pointed upper section around the doorway rather than framing the entire opening. I’ve noticed that strong architectural shapes often have more impact than adding many small decorations. Keep nearby walls relatively simple so the coffin shape remains the main focal point. When Halloween ends, lightweight panels can be removed and stored flat, making the project practical for repeat seasonal use.
Shadow Silhouette Wall

- Use oversized silhouettes to create strong Halloween imagery on an otherwise plain wall.
- Choose recognizable shapes such as cats, witches, trees, or flying bats.
- Keep the background simple so the silhouettes remain visually powerful.
- Use directional lighting to create sharper shadows and stronger contrast.
A shadow silhouette wall can transform a blank hallway surface into a dramatic Halloween display using simple shapes and carefully positioned lighting. Create or purchase large black silhouettes of witches, cats, crooked trees, bats, or haunted houses, then arrange them across one wall. Keep the shapes mostly solid and graphic so they are easy to recognize from a distance. A pale cream, gray, or muted beige wall provides strong contrast against the dark silhouettes. Position a warm directional light nearby to create depth and emphasize the edges.
This approach is especially useful when you want spooky decor without filling the hallway with physical objects. Because the silhouettes are flat, they take almost no space and can be arranged around existing artwork or furniture. In my experience, larger shapes usually create a cleaner result than many tiny cutouts, particularly in long hallways where details need to remain visible from several feet away. Use removable adhesive strips when appropriate for your wall finish, and keep the composition concentrated in one area. The result feels graphic, modern, and unmistakably Halloween-inspired.
Autumn Lantern Trail

- Combine Halloween mood with cozy autumn styling using a row of lanterns.
- Choose different lantern sizes to create a more natural visual rhythm.
- Add small pumpkins, leaves, or dried stems between selected lanterns.
- Use flameless candles for safer indoor seasonal lighting.
An autumn lantern trail creates a warm Halloween atmosphere while keeping the hallway inviting rather than overly frightening. Place several lanterns along one side of the passage, using different sizes and shapes to create visual rhythm. Fill them with flameless candles that produce a soft amber glow, then add small pumpkins, dried leaves, pinecones, or natural branches between selected lanterns. Black metal lanterns create a classic Halloween appearance, while aged bronze or wood finishes give the arrangement a softer autumn character. Keep the center of the hallway open for easy movement.
This idea is particularly effective in homes where Halloween decorations need to blend naturally with existing fall decor. Instead of changing the entire hallway, you can simply introduce darker accents and atmospheric lighting. I’ve noticed that repeating warm light throughout a long passage makes the space feel more connected, especially when the hallway has limited natural illumination. Choose stable lanterns with enclosed designs and battery-powered candles for everyday safety. The finished display can also transition easily into November by removing pumpkins or spooky details while leaving the lantern arrangement in place.
Haunted Door Collection
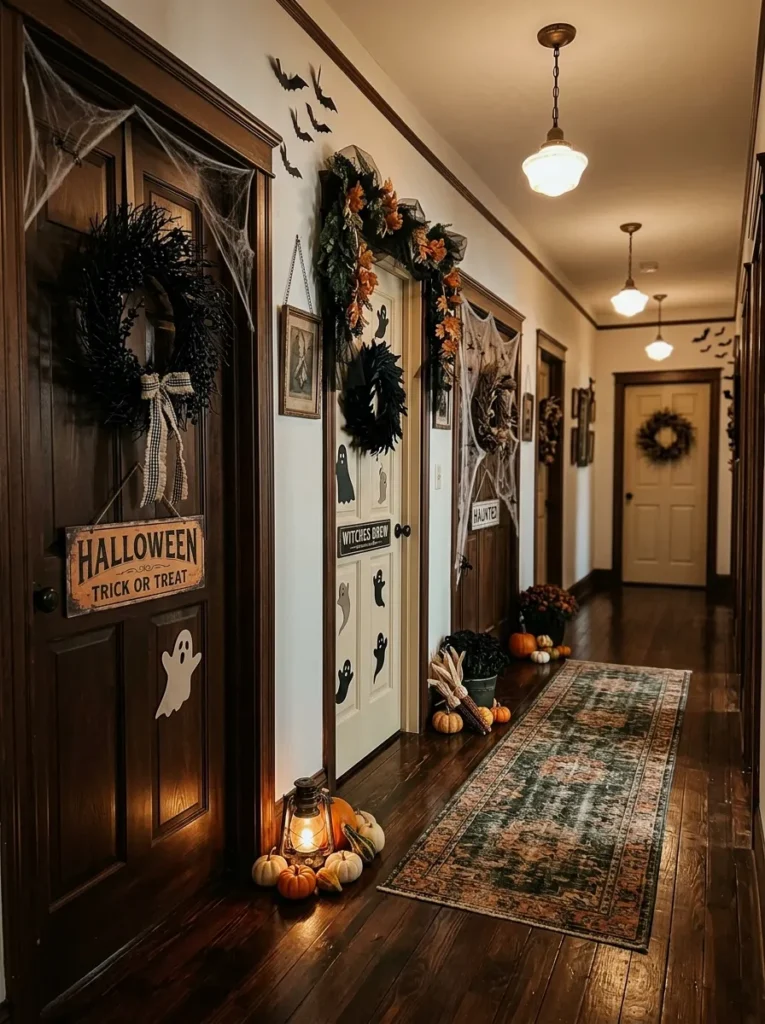
- Decorate several hallway doors with different spooky themes for a coordinated display.
- Use removable wreaths, signs, silhouettes, and small props to personalize each door.
- Keep a consistent color palette so the hallway feels connected.
- Choose lightweight decorations that can be removed easily after Halloween.
A hallway becomes much more memorable when each door gets its own small Halloween treatment. Decorate several doors with different but coordinated details, such as black wreaths, ghost silhouettes, spiderwebs, vintage signs, or miniature pumpkins. Keep the colors consistent with black, cream, muted orange, gray, and dark green so the individual doors still feel like part of one overall display. Because the decorations stay on the doors rather than occupying the floor, this approach works especially well in narrow hallways. It also lets you create variety without overwhelming the shared space.
For a polished result, give each door one main focal point instead of covering the entire surface. A simple black wreath might work on one door, while another could feature a hanging ghost or distressed Halloween sign. I’ve noticed that repeating a few materials throughout the hallway makes separate decorations feel intentionally coordinated. Use removable hooks or suitable adhesive whenever possible, particularly on painted or delicate doors. This final setup is also easy to customize for your home, making it one of the most flexible halloween hallway ideas for creating a complete seasonal look.
Conclusion
A hallway can become a surprisingly powerful part of your Halloween decorating, especially when you use simple details with intention. These halloween hallway ideas offer plenty of ways to add spooky charm through lighting, wall decor, seasonal textures, pumpkins, silhouettes, and dramatic focal points. Choose one idea or combine several to create a look that feels right for your home. I’ve seen how small changes can completely transform an overlooked passage. Save this post on Pinterest for your next decorating project, try your favorite idea, and share it with someone who loves creating a spooky seasonal home. Have fun making your hallway unforgettable!